Appboard/2.5/builder/stacked widgets
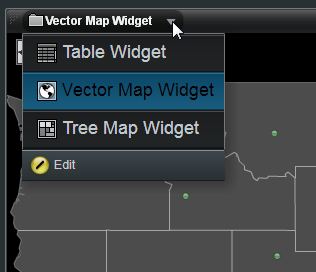
Stacked Widgets enable multiple Widgets to be overlaid, and presented in the same area of a Board. Only one of the Widgets in the Stacked Widget is displayed at a time. The others are hidden beneath the currently displayed Widget. The User can select from a pre-configured list of Widgets to determine which one to display in that portion of the screen at the current time.
In cases where certain Widgets only need to be seen at specific times, this feature can enable the Board designer to provide a greater potential amount of information in a smaller space.
Creating Stacked Widgets
Perform the following steps to create Stacked Widgets:
- Log in to AppBoard as an administrator.
- Click the Builder mode to display the Board preview screen.
- Select the Stack on which you want to stack Widgets.
- Make sure all of the Widgets to be stacked are displayed on the Board.
- Identify the first two Widgets that you want in the Widget stack. Drag one of the Widgets completely over the other Widget, so that the entire Widget is highlighted. Drop the Widget on to the highlighted area to create the Stacked Widgets.
- Repeat the process, if desired, to add additional Widgets on to the Stacked Widgets.
Unstacking Stacked Widgets
Perform the following steps to un-stack Stacked Widgets so they operate independently again as standard Widgets:
- Log in to AppBoard as an administrator.
- Click the Builder mode to display the Board preview screen.
- Click the upper-left area of the Stacked Widgets, as if you were going to drag them to another part of the screen.
- Observe highlighted areas where you can drop a Widget. Drop the Widget on to a highlighted area, and it will become un-stacked.
- Repeat as needed until all of the desired Widgets are un-stacked.
Editing Stacked Widgets Configuration
Perform the following steps to edit the configuration of Stacked Widgets:
- Log in to AppBoard as an administrator.
- Mouse over the title of the currently displayed Stacked Widget in the Widget header bar.
- Click the arrow to display the Widget selector drop-down list.
- Click Edit at the bottom of the list. The Stacked Widgets Options screen is displayed.
Stacked Widgets Options
Several options are available to the administrator on the Stacked Widgets Options screen.
Stack Order
The Stack Order controls the order in which the Widgets will be listed when the User clicks the arrow to display the Widget selector drop-down list. It also controls the order that the Widgets will be displayed when the "Auto Cycle Widgets" option is enabled.
To modify the Stack Order, click on the triangle icon in the upper left of the row for a Widget and drag the Widget up or down in the list to create the desired ordering.
Auto Cycle Widgets
Some AppBoard displays are designed to rotate between various views without any interaction from the User. For example, you may want a display on a big board in a network operations center to automatically rotate to different Widget displays.
When "Auto Cycle Widgets" is enabled, the Stacked Widgets will begin by displaying the first Widget in the Stack Order, and then will automatically switch to displaying the next Widget in the Stack Order after the Cycle Delay interval is expired. The process continues for as long as the Stacked Widgets are on the selected display, or until the user clicks the Pause button to stop the rotation. When "Auto Cycle Widgets" is enabled, a Pause button is displayed in the Widget header bar.
The default value of the Cycle Delay interval is 20 seconds. This value can be changed in the Theme Editor under Widget Container / Stacked Widget Cycle Delay (Seconds).
Disable User Switching
When "Disable User Switching" is enabled, the end-user (viewer) of the Board will not be provided the options in the Widget header bar for choosing which Widget to display, or for pausing the Auto Cycle (if "Auto Cycle Widgets" is enabled).
"Show Widget" Action
The Show Widget Action works in conjunction with Stacked Widgets. You may have a situation where a specific interaction by the User in one Widget (Widget A) should display one of the specific Widgets inside of the Stacked Widget container (Widget B). In this case, you can configure the Show Widget Action on Widget A to name a specific Widget to be displayed in Widget B.


