Appboard/old/configuration database: Difference between revisions
imported>Jason.nicholls |
imported>Jason.nicholls |
||
| Line 16: | Line 16: | ||
== Using an External Configuration Database == | == Using an External Configuration Database == | ||
{{Note|The appropriate JDBC driver must be installed before starting this process!}} | |||
[[File:appboard-2.4-dbsetup.png|right|frame|DB Setup Tool]] | |||
enPortal / AppBoard includes a utility to set up and configure an external configuration database. Please note this assumes the appropriate JDBC driver is installed, and you have an external database to connect to along with access credentials: | enPortal / AppBoard includes a utility to set up and configure an external configuration database. Please note this assumes the appropriate JDBC driver is installed, and you have an external database to connect to along with access credentials: | ||
| Line 24: | Line 25: | ||
# Run the setup tool in the <tt>[INSTALL_HOME]/server/bin</tt>: | # Run the setup tool in the <tt>[INSTALL_HOME]/server/bin</tt>: | ||
#: <tt>> portal dbsetup</tt> | #: <tt>> portal dbsetup</tt> | ||
# This will launch a graphical user interface to assist with the configuration. | # This will launch a graphical user interface to assist with the configuration as shown to the right. | ||
## Use the ''Database'' button to select from a list of pre-configured templates, such as MySQL. | |||
## Adjust the ''Host'' and ''Port'' fields to match the database host and port. After making a database selection the port will default to the default for that database type. | |||
## Set the ''Database Name'' field to match the name of the database created to store the AppBoard configuration data. It is recommended this database is ''only'' used by AppBoard. | |||
## Set the ''User'' and ''Password'' used to authenticate against the database. | |||
## Click the ''Test'' button to establish a connection and ensure the details are correct. | |||
## The ''Advanced Url...'' button can be used to set specific JDBC connection parameters. | |||
## The ''Advanced...'' button can be used to configure some additional connection management settings. | |||
## Click the ''Ok'' button to save changes and exit the tool. | |||
{{Note|The dbsetup tool can be re-run to make changes to the configuration as needed. Also the actual configuration information is stored in <tt>[INSTALL_HOME]/server/webapps/enportal/WEB-INF/config/persist.properties</tt> and can be modified directly however it is recommended to use the tool. In support situations this file may be requested for inspection.}} | |||
Revision as of 06:25, 18 July 2014
A default installation of AppBoard / enPortal will use an in-memory H2 database that runs within the same process as the main application. This is the easiest and most convenient configuration but in clustered and/or high availability environments it may be necessary to configure an external shared database.
The configuration database is used to store a variety of system configuration:
- enPortal users
- enPortal channel configuration
- enPortal Single Sign-on tokens
- AppBoard (versions 2.3 or later) Stacks, Boards, Widgets, filter rules, etc...
This database is only used for configuration data and the resource requirements are very minimal if using an external database.
Using an External Configuration Database
enPortal / AppBoard includes a utility to set up and configure an external configuration database. Please note this assumes the appropriate JDBC driver is installed, and you have an external database to connect to along with access credentials:
- Run the setup tool in the [INSTALL_HOME]/server/bin:
- > portal dbsetup
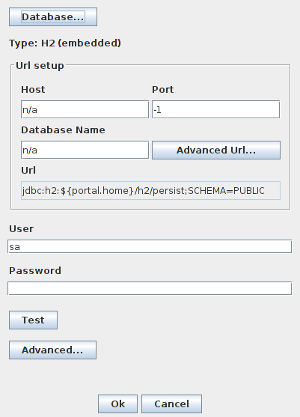
- This will launch a graphical user interface to assist with the configuration as shown to the right.
- Use the Database button to select from a list of pre-configured templates, such as MySQL.
- Adjust the Host and Port fields to match the database host and port. After making a database selection the port will default to the default for that database type.
- Set the Database Name field to match the name of the database created to store the AppBoard configuration data. It is recommended this database is only used by AppBoard.
- Set the User and Password used to authenticate against the database.
- Click the Test button to establish a connection and ensure the details are correct.
- The Advanced Url... button can be used to set specific JDBC connection parameters.
- The Advanced... button can be used to configure some additional connection management settings.
- Click the Ok button to save changes and exit the tool.
- Run the portal dbsetup" command in ${INSTALL_HOME}/bin directory. When you run this command, there is a GUI that assists with selecting the database type and configuring the database connection. This tool saves changes to the file: /server/webapps/enportal/WEB-INF/config/persist.properties, with the specific configuration details that you provide for you database connection. If your server does not have a graphical display, you can modify this file directly in lieu of running the dbsetup command.
- Configure a database connection in the dbsetup GUI, by completing the following:
- Click the Database button and select your type of database from the selection list (e.g. Oracle)
- Set the Host and Port fields to match the IP location of your database (as resolved from the enPortal/AppBoard server).
- Set the Database Name field to match the name of the database created to store the enPortal/AppBoard data.
- Set the User and Password fields to match the database user and password that were configured on your database to control access.
- Test the Connection by clicking the Test button to verify the database connection settings.
- Select Ok to save the changes and exit the tool.
If you need to actually install/create the external database the following guide may be of assistance Configuring Databases.

