Appboard/old/custom data adapter: Difference between revisions
imported>Jay.barr |
imported>Jason.nicholls |
||
| (12 intermediate revisions by 3 users not shown) | |||
| Line 1: | Line 1: | ||
{{DISPLAYTITLE:Custom Data Adapter}} | |||
[[Category:AppBoard old]] | |||
== Environment == | == Environment == | ||
* Java SDK (ver 1.6 or greater) - Recommend adding the SDK's bin directory to your PATH. | * Java SDK (ver 1.6 or greater) - Recommend adding the SDK's bin directory to your PATH. | ||
* Eclipse (ver 3.6+ recommended) - Project works best with M2Eclipse plugin for Maven building, but it is not required. | * Eclipse (ver 3.6+ recommended) - Project works best with M2Eclipse plugin for Maven building, but it is not required. | ||
* AppBoard release with license (ver 2.0 | * AppBoard release with license (ver 2.1.0+) | ||
== Exercise Objective and Setup == | == Exercise Objective and Setup == | ||
| Line 18: | Line 20: | ||
Extract the contents of the AppBoard release into desired directory, referenced as <tt><AB-Home></tt> from here on. Run <tt><AB-Home>/server/bin/startup.bat</tt> to start Tomcat, and then browse to <tt>http://localhost:8080/</tt>. You should see the following: | Extract the contents of the AppBoard release into desired directory, referenced as <tt><AB-Home></tt> from here on. Run <tt><AB-Home>/server/bin/startup.bat</tt> to start Tomcat, and then browse to <tt>http://localhost:8080/</tt>. You should see the following: | ||
[[File: | [[File:Da-login.png|center|546px]] | ||
Login with the default administrator credentials: | Login with the default administrator credentials: | ||
| Line 27: | Line 29: | ||
Once you have logged in, click on the AppBoard tab and you will be taken to the Visual Builder's main screen: | Once you have logged in, click on the AppBoard tab and you will be taken to the Visual Builder's main screen: | ||
[[File: | [[File:Da-initial-ab.png|center|546px]] | ||
To verify the demo adapter was loaded, select <tt>Data Sources</tt> and then <tt>Add</tt> from Visual Builder. Enter <tt>demo.demoadapter</tt> for <tt>Name</tt> and select <tt>Third Party</tt> and <tt>Demo Adapter</tt> for adapter type. | To verify the demo adapter was loaded, select <tt>Data Sources</tt> and then <tt>Add</tt> from Visual Builder. Enter <tt>demo.demoadapter</tt> for <tt>Name</tt> and select <tt>Third Party</tt> and <tt>Demo Adapter</tt> for adapter type. | ||
[[File: | [[File:Da-newsource.png|center|546px]] | ||
== Configuring Java Project == | == Configuring Java Project == | ||
| Line 37: | Line 39: | ||
Data Adapters are implemented in Java and require the <tt>edge-apb-<version>.jar</tt> to be compiled, as well as any other JARs containing additional classes used in the adapter (e.g. log4j for logging). The AppBoard Java SDK includes a pre-configured Eclipse project that builds using the default Eclipse Java compiler and can have Maven support from the M2Eclipse plugin enabled via the project's content menu (Maven > Enable Dependency Management). | Data Adapters are implemented in Java and require the <tt>edge-apb-<version>.jar</tt> to be compiled, as well as any other JARs containing additional classes used in the adapter (e.g. log4j for logging). The AppBoard Java SDK includes a pre-configured Eclipse project that builds using the default Eclipse Java compiler and can have Maven support from the M2Eclipse plugin enabled via the project's content menu (Maven > Enable Dependency Management). | ||
== Extending Base | == Extending Base DataAdapter Class == | ||
AppBoard Data Adapters extend the | AppBoard Data Adapters extend the base class <tt>com.edgetech.services.DataAdapter</tt> (Note: package will probably be renamed to <tt>com.edgetech.appboard</tt> in a future release). | ||
Data Adapters must provide the following services, which will be described in detail in the subsequent sections: | Data Adapters must provide the following services, which will be described in detail in the subsequent sections: | ||
| Line 91: | Line 93: | ||
SettingDef cacheTimeout = new SettingDef( | SettingDef cacheTimeout = new SettingDef( | ||
DataAdapter.CACHE_TIMEOUT, | |||
"Number of seconds to cache data..", | "Number of seconds to cache data..", | ||
AttributeType.NUMBER, "30"); | AttributeType.NUMBER, "30"); | ||
| Line 103: | Line 105: | ||
The settings can be seen in the Builder by continuing with the data source addition by selecting <tt>Add Data Source</tt>, which will display the <tt>Connect</tt> screen in the <tt>Data Source Wizard</tt>, shown below: | The settings can be seen in the Builder by continuing with the data source addition by selecting <tt>Add Data Source</tt>, which will display the <tt>Connect</tt> screen in the <tt>Data Source Wizard</tt>, shown below: | ||
[[File: | [[File:Da-settings.png|center|546px]] | ||
Note the settings defined in <tt>getSettingDefs()</tt> appear in order in the wizard. | Note the settings defined in <tt>getSettingDefs()</tt> appear in order in the wizard. | ||
| Line 136: | Line 138: | ||
Continuing in the wizard in the Builder, clicking on <tt>Next</tt> will display the two Entities under the <tt>Explore</tt> heading, as shown below: | Continuing in the wizard in the Builder, clicking on <tt>Next</tt> will display the two Entities under the <tt>Explore</tt> heading, as shown below: | ||
[[File: | [[File:Da-entities.png|center|546px]] | ||
=== List Attributes for the adapter === | === List Attributes for the adapter === | ||
| Line 189: | Line 191: | ||
Continuing the walk through in the Builder, expand the Entities <tt>Sine Wave</tt> and <tt>Associated Data</tt> to see the Attributes of each and compare with the code above. | Continuing the walk through in the Builder, expand the Entities <tt>Sine Wave</tt> and <tt>Associated Data</tt> to see the Attributes of each and compare with the code above. | ||
[[File: | [[File:Da-ents_attrs.png|center|546px]] | ||
Note that the types of the Attributes are grayed out and not editable. This is specified in the adapter class by overriding the following method: | Note that the types of the Attributes are grayed out and not editable. This is specified in the adapter class by overriding the following method: | ||
| Line 237: | Line 239: | ||
Selecting <tt>Next</tt> in the wizard will continue to the Association(s) defined for the new Data Source, and the following screen shows the Association between the <tt>Key</tt> Attribute of <tt>Sine Wave</tt> and the <tt>Wave Key</tt> Attribute of <tt>Associated Data</tt>: | Selecting <tt>Next</tt> in the wizard will continue to the Association(s) defined for the new Data Source, and the following screen shows the Association between the <tt>Key</tt> Attribute of <tt>Sine Wave</tt> and the <tt>Wave Key</tt> Attribute of <tt>Associated Data</tt>: | ||
[[File: | [[File:Da-associations.png|center|546px]] | ||
=== Retrieve data for the adapter === | === Retrieve data for the adapter === | ||
Once all the Entities, Attributes, and Associations for the new Data Source have been exposed through the Data Adapter, the adapter must implement one or more methods for providing the data. For | Once all the Entities, Attributes, and Associations for the new Data Source have been exposed through the Data Adapter, the adapter must implement one or more methods for providing the data. The easiest approach, and often sufficient for data sets that are not big (e.g. more than 10,000 records), is to fully cache all data from the source. For this approach, the single method <tt>fetchRecords</tt> must be implemented, which returns a full set of all data for a specified Entity. | ||
The data is produced as a collection of <tt>GenericRecords</tt>, which store the Entity for the record and a map of data, where the keys are the names of Attributes and the values are Java Objects (typically String, Date, or Numeric types). | The data is produced as a collection of <tt>GenericRecords</tt>, which store the Entity for the record and a map of data, where the keys are the names of Attributes and the values are Java Objects (typically String, Date, or Numeric types). | ||
<code>[java,N] | <code>[java,N] | ||
public void fetchRecords(ServiceRequestFacade request, | |||
ServiceResponseFacade response) throws Exception | |||
{ | |||
String entityName = request.getEntity().getEntityName(); | |||
List<GenericRecord> recordList = new ArrayList<GenericRecord>(); | List<GenericRecord> recordList = new ArrayList<GenericRecord>(); | ||
| Line 294: | Line 296: | ||
} | } | ||
response.addGenericRecords(recordList); | |||
} | } | ||
</code> | </code> | ||
[[File: | The Entities exposed through the new Data Source created in the Builder using the DemoDataAdapter are exposed as Data Collections. Data Collections are the client-side representation of a single Entity, although multiple Data Collections may be backed by the same server-side Entity. This is needed as each client-side Data Collection may be filtered, and filtered and unfiltered views of data from a single Entity may be desired. | ||
[[File:Da-collections.png|center|546px]] | |||
To see the data returned, click the icon under <tt>Preview</tt> for the <tt>Sine Wave</tt> Entity. Along with the defined Attributes of <tt>Key</tt>, <tt>Timestamp</tt>, and <tt>Value</tt>, notice the additional columns showing the generated <tt>id</tt> and the <tt>Associated Data</tt> Association. | |||
[[File:Da-previewcollection.png|center|546px]] | |||
== Demo AppBoard Stack == | |||
Below is a Stack created with one Widget showing a Line Chart of the <tt>Sine Wave</tt> Data Collection and another showing a Table of the <tt>Associated Data</tt> Data Collection. The <tt>Associated Data</tt> is filtered via a selection action on the <tt>Sine Wave</tt> chart. | |||
[[File:Da-demostack.png|center|546px]] | |||
== Completion and Validation == | |||
Once the above steps are completed, the adapter needs to be formalized. The adapter developer must go through the [[appboard/old/data_adapter_checklist|Adapter Checklist]] to confirm that all activities are complete. | |||
== Advanced Adapter Concepts == | |||
[[ | This example has demonstrated to use of fetchRecords() to retrieve and replace all records for an entity on update. For many uses, this is adequate and the most expedient solution. However, for some adapters with large data sets, more efficient data retrieval techniques need to be employed. Examples can be found on the [[appboard/old/advanced_data_adapter|AppBoard Advanced Data Adapter]] page. | ||
Latest revision as of 11:09, 17 July 2014
Environment
- Java SDK (ver 1.6 or greater) - Recommend adding the SDK's bin directory to your PATH.
- Eclipse (ver 3.6+ recommended) - Project works best with M2Eclipse plugin for Maven building, but it is not required.
- AppBoard release with license (ver 2.1.0+)
Exercise Objective and Setup
This exercise walks though the creation of a Data Adapter for AppBoard and its installation and testing. The AppBoard Java SDK includes a packaged version of the DemoDataAdapter the exercise describes. This can be loaded into AppBoard to walk through the exercise with a running adapter.
- Copy demo-adapter.jar into the <AppBoard-Home>/server/webapps/enportal/WEB-INF/lib/ directory.
- Edit <AppBoard-Home>/server/webapps/enportal/WEB-INF/config/appboard-custom.properties and add the following line:
- appboard.registry.DemoDataAdapter=com.demo.DemoDataAdapter
- Start Tomcat with <AppBoard-Home>/server/startup.bat
Verify Environment
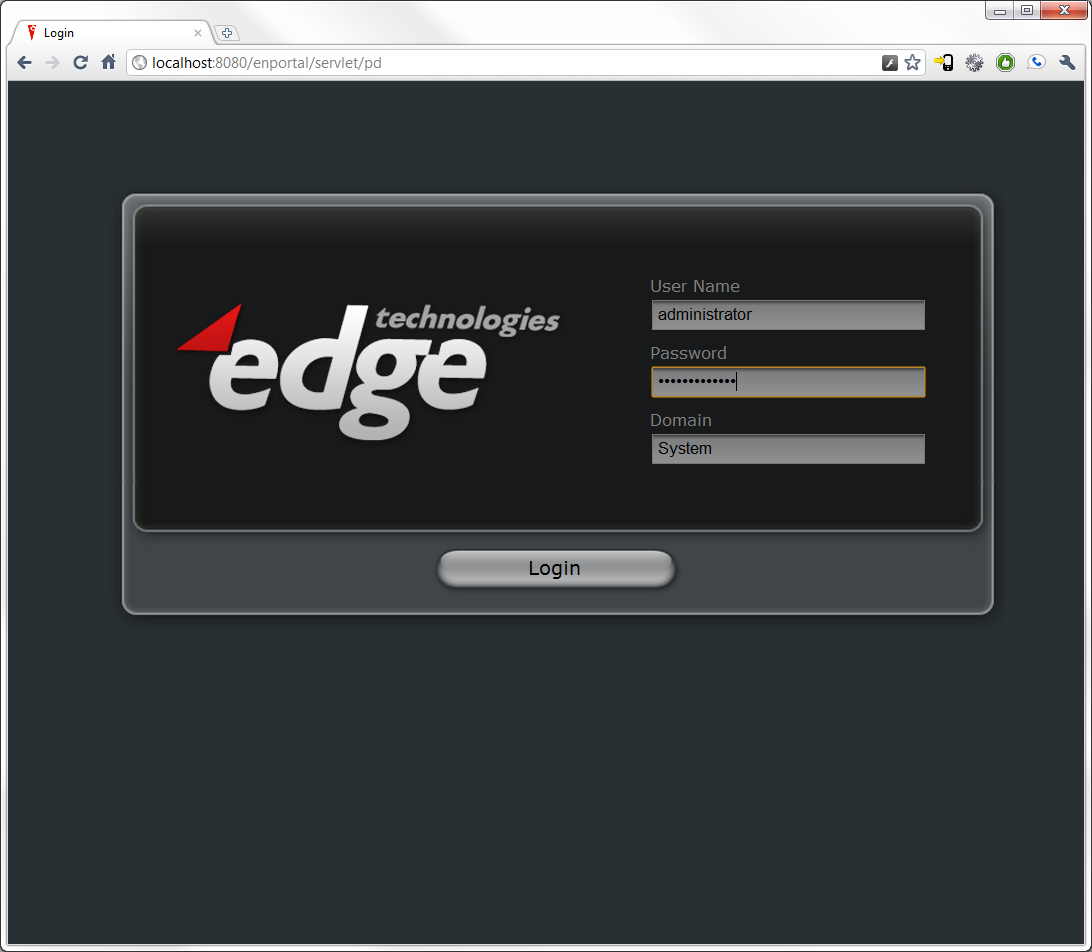
Extract the contents of the AppBoard release into desired directory, referenced as <AB-Home> from here on. Run <AB-Home>/server/bin/startup.bat to start Tomcat, and then browse to http://localhost:8080/. You should see the following:
Login with the default administrator credentials:
- User: administrator
- Password: administrator
- Domain: System
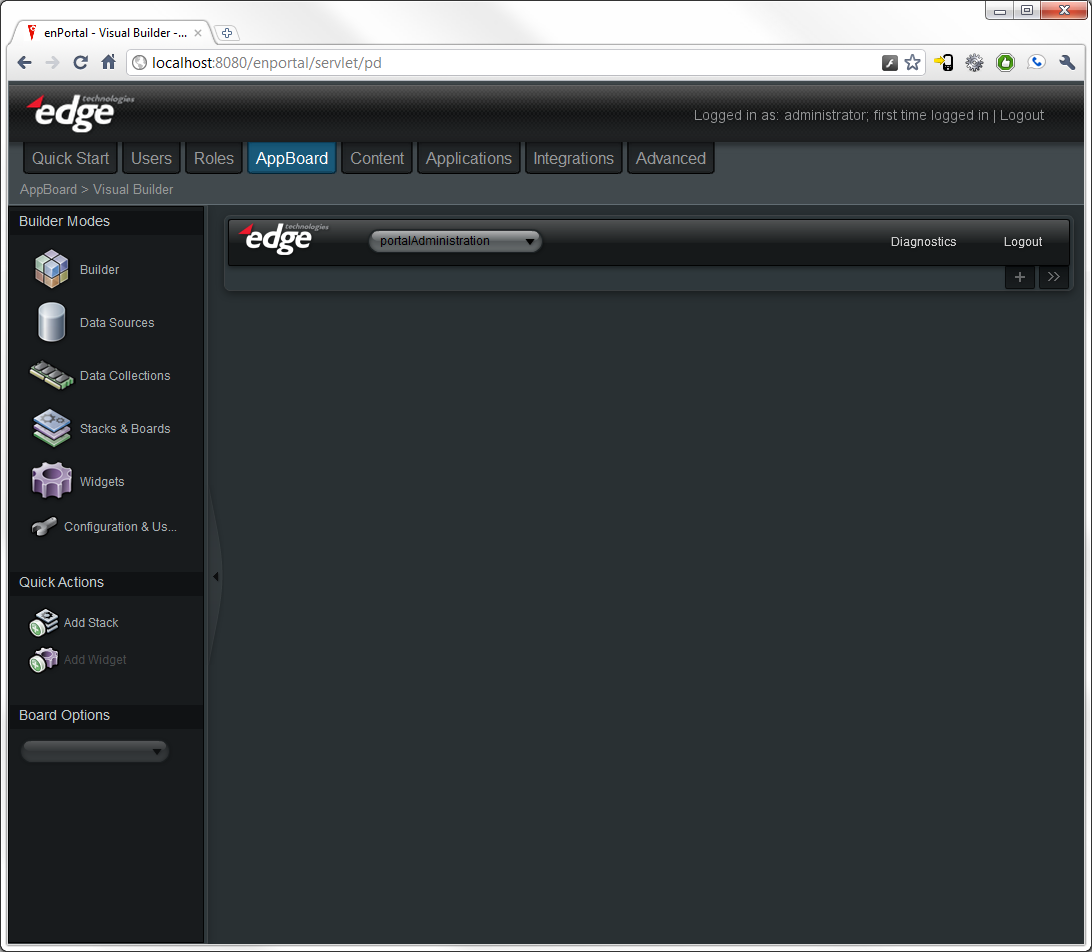
Once you have logged in, click on the AppBoard tab and you will be taken to the Visual Builder's main screen:
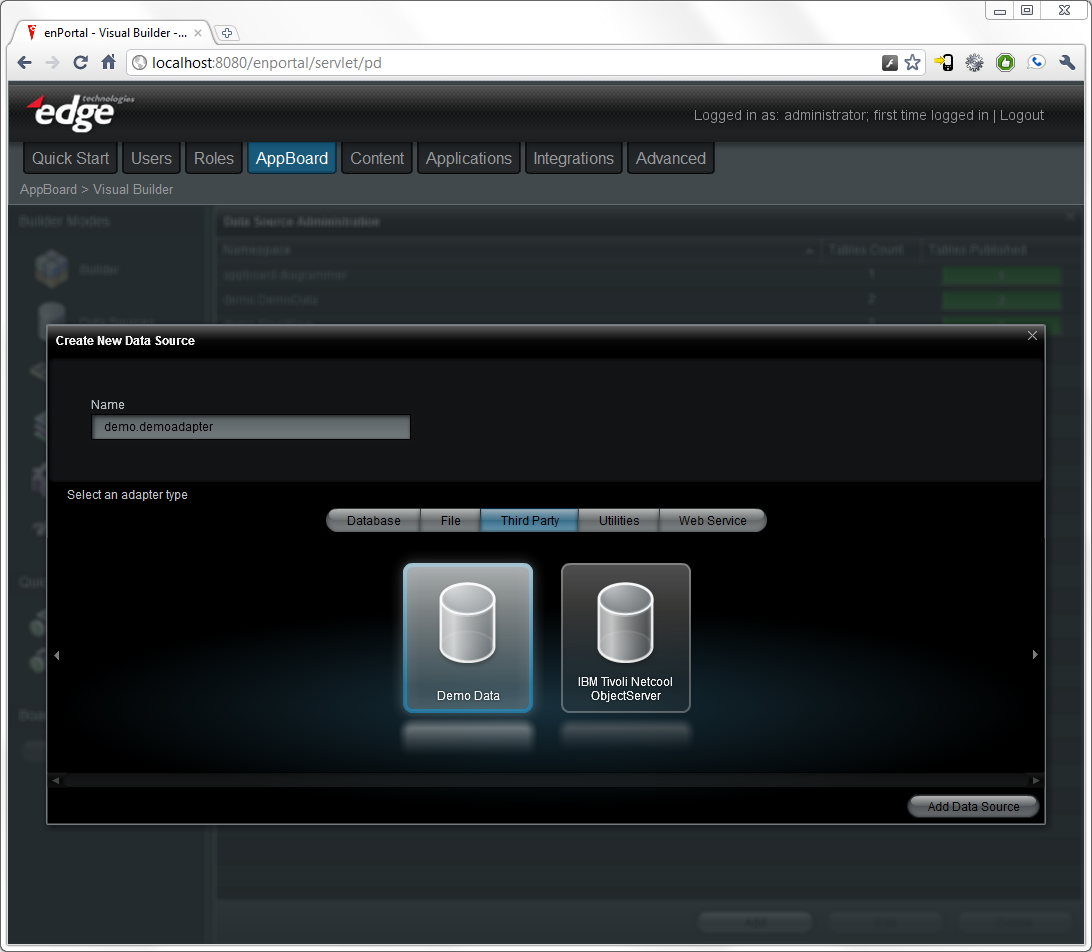
To verify the demo adapter was loaded, select Data Sources and then Add from Visual Builder. Enter demo.demoadapter for Name and select Third Party and Demo Adapter for adapter type.
Configuring Java Project
Data Adapters are implemented in Java and require the edge-apb-<version>.jar to be compiled, as well as any other JARs containing additional classes used in the adapter (e.g. log4j for logging). The AppBoard Java SDK includes a pre-configured Eclipse project that builds using the default Eclipse Java compiler and can have Maven support from the M2Eclipse plugin enabled via the project's content menu (Maven > Enable Dependency Management).
Extending Base DataAdapter Class
AppBoard Data Adapters extend the base class com.edgetech.services.DataAdapter (Note: package will probably be renamed to com.edgetech.appboard in a future release).
Data Adapters must provide the following services, which will be described in detail in the subsequent sections:
- List the Settings that can modify the behavior of the adapter
- List the Entities served by the adapter
- List the Attributes for each Entity
- List the Associations between Entities
- Retrieve the data that comprise the Entities
List Settings for the adapter
The adapter must inform the AppBoard server of the settings that can modify the behavior of the adapter. This is done through the method: public List<SettingDef> getSettingDefs(). SettingDef stores information about the setting such as name, description, data type, and default value. The implementation for DemoDataAdapter follows:
[java,N]
public List<SettingDef> getSettingDefs() {
	List<SettingDef> settings = new ArrayList<SettingDef>(10);
	SettingDef wavePeriod = new SettingDef(SETTING_WAVE_PERIOD,
			"Time in seconds for one period of sine wave.",
			AttributeType.NUMBER, "60");
	wavePeriod.setRequired(true);
	settings.add(wavePeriod);
	SettingDef waveAmplitude = new SettingDef(SETTING_WAVE_AMPLITUDE,
			"Amplitude of the sine wave.", AttributeType.NUMBER, "50");
	waveAmplitude.setRequired(true);
	settings.add(waveAmplitude);
	SettingDef waveOffset = new SettingDef(SETTING_WAVE_OFFSET,
			"Zero offset for sine wave.", AttributeType.NUMBER, "50");
	waveOffset.setRequired(true);
	settings.add(waveOffset);
	SettingDef dataDuration = new SettingDef(SETTING_DURATION,
			"Length of time to display data, in seconds.",
			AttributeType.NUMBER, "600");
	waveOffset.setRequired(true);
	settings.add(dataDuration);
	SettingDef dataInterval = new SettingDef(SETTING_DATA_INTERVAL,
			"Time between samples, in seconds.",
			AttributeType.NUMBER, "10");
	dataInterval.setRequired(true);
	settings.add(dataInterval);
	SettingDef assocationDataPoints = new SettingDef(
			SETTING_ASSOCIATED_DATA_POINTS,
			"Number of data points each side of value. Zero disables association.",
			AttributeType.NUMBER, "3");
	assocationDataPoints.setRequired(true);
	settings.add(assocationDataPoints);
	SettingDef cacheTimeout = new SettingDef(
			DataAdapter.CACHE_TIMEOUT,
			"Number of seconds to cache data..",
			AttributeType.NUMBER, "30");
	cacheTimeout.setRequired(true);
	settings.add(cacheTimeout);
	return settings;
}
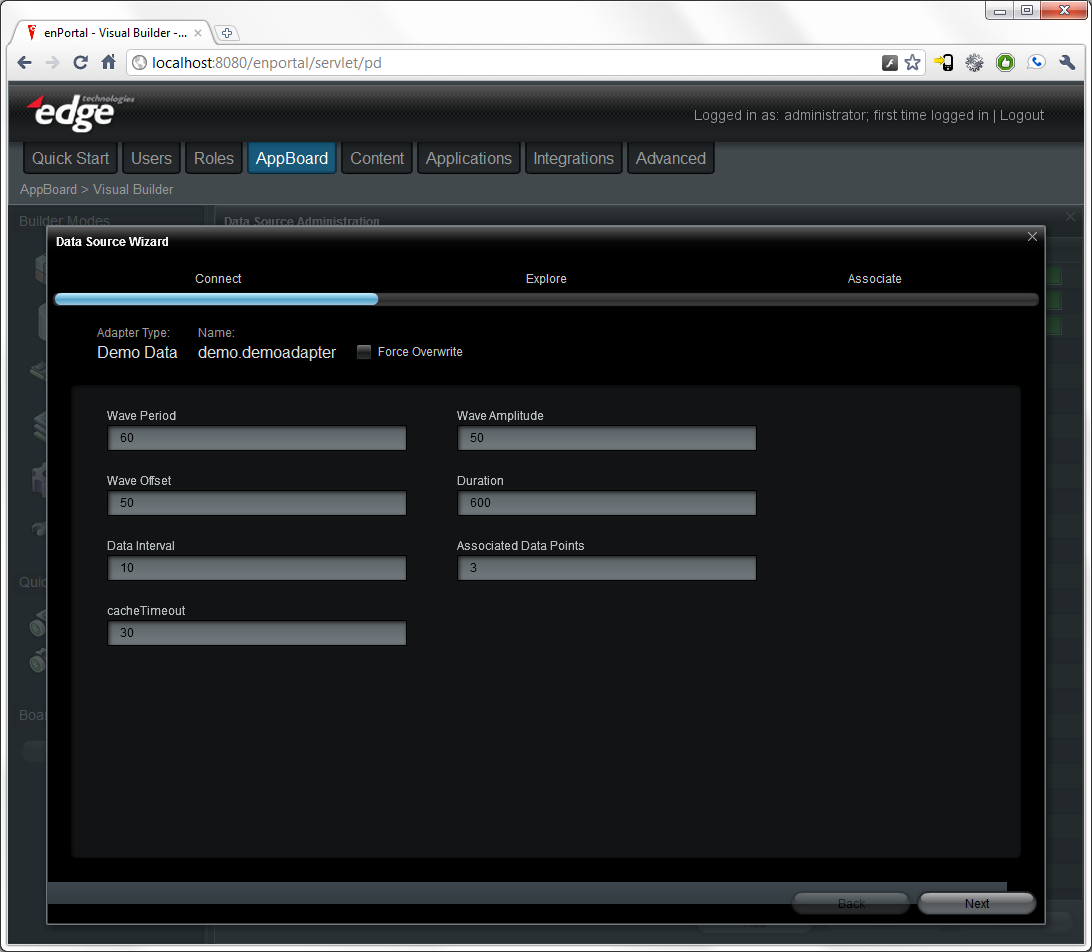
The settings can be seen in the Builder by continuing with the data source addition by selecting Add Data Source, which will display the Connect screen in the Data Source Wizard, shown below:
Note the settings defined in getSettingDefs() appear in order in the wizard.
List Entities for the adapter
Once the new Data Source (instance of Data Adapter on server) has the settings needed to connect to the source, the adapter next needs to return the set of Entities (tabular data sets) that the adapter provides. By convention, Entities are registered with a Namespace that is under that of the Data Source. DemoDataAdapter exposes Entities Sine Wave and Associated Data, so if a Data Source was created with Namespace demo.demoadapter, two Entities would be registered at demo.demoadapter.Sine Wave and demo.demoadapter.Associated Data.
[java,N]
public Collection<Entity> getEntities() throws AdapterLoadException {
	List<Entity> entities = new ArrayList<Entity>();
	Entity thisEntity = new Entity(ENTITY_SINE_WAVE, getDefinition().getNamespace());
	entities.add(thisEntity);
	logger.info("Defining entity \"" + thisEntity.getEntityName()
			+ "\" in namespace \"" + thisEntity.getNamespace() + "\"");
	if (getSettingAsInt(SETTING_ASSOCIATED_DATA_POINTS, 0) != 0) {
		thisEntity = new Entity(ENTITY_ASSOCIATED_DATA, getDefinition()
				.getNamespace());
		entities.add(thisEntity);
		logger.info("Defining entity \"" + thisEntity.getEntityName()
				+ "\" in namespace \"" + thisEntity.getNamespace() + "\"");
}
	return entities;
}
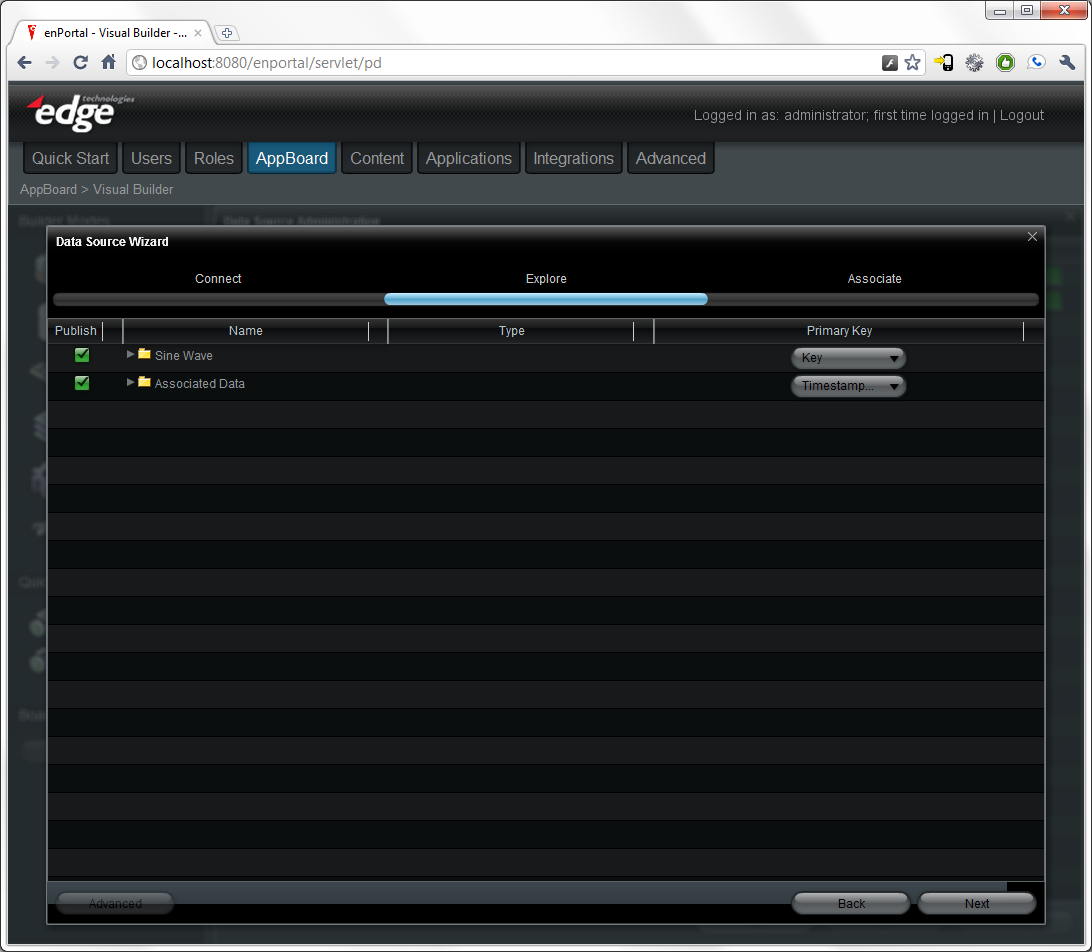
Continuing in the wizard in the Builder, clicking on Next will display the two Entities under the Explore heading, as shown below:
List Attributes for the adapter
Each Entity is comprised of one or more Attributes, and each data record returned for the Entity will have some or all of those Attributes set. To inform AppBoard of the Attributes in the Entity, the findAttributeDefinitions method must be implemented, which returns the set of Attributes for a specified Entity. Each Attribute is defined in an AttributeDef, which specifies the name and type of the Attribute, along with whether it is an identity (unique) Attribute for the Entity.
[java,N]
public Collection<AttributeDef> findAttributeDefinitions(Entity entityDef)
		throws AdapterLoadException {
	List<AttributeDef> attributes = new ArrayList<AttributeDef>(5);
	AttributeDef thisAttribute;
	String entityName = entityDef.getEntityName();
	logger.info("Getting attribues for " + entityName);
	if (ENTITY_SINE_WAVE.equals(entityName)) {
		thisAttribute = new AttributeDef(ATTR_KEY, true, "STRING");
		thisAttribute.setIdentity(true);
		attributes.add(thisAttribute);
		thisAttribute = new AttributeDef(ATTR_TIMESTAMP, false, "DATE");
		attributes.add(thisAttribute);
		thisAttribute = new AttributeDef(ATTR_VALUE, false, "NUMBER");
		attributes.add(thisAttribute);
	} else if (ENTITY_ASSOCIATED_DATA.equals(entityName)) {
		thisAttribute = new AttributeDef(ATTR_TIMESTAMP_OFFSET, true, "STRING");
		thisAttribute.setIdentity(true);
		attributes.add(thisAttribute);
		thisAttribute = new AttributeDef(ATTR_WAVE_KEY, false, "STRING");
		attributes.add(thisAttribute);
		thisAttribute = new AttributeDef(ATTR_TIMESTAMP, false, "DATE");
		attributes.add(thisAttribute);
		thisAttribute = new AttributeDef(ATTR_OFFSET, false, "NUMBER");
		attributes.add(thisAttribute);
		thisAttribute = new AttributeDef(ATTR_DESCRIPTION, false, "STRING");
		attributes.add(thisAttribute);
	} else {
		logger.equals("Entity not defined: " + entityName);
		throw new AdapterLoadException();
	}
	return attributes;
}
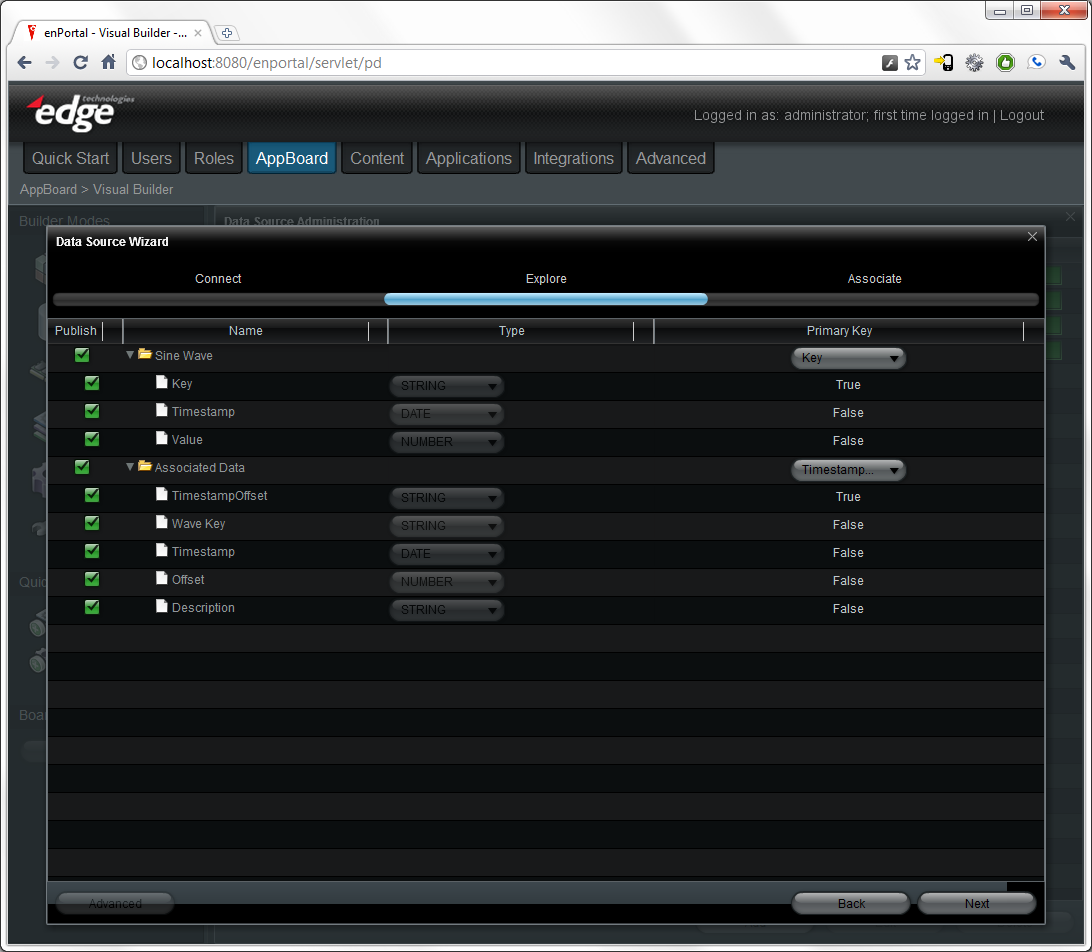
Continuing the walk through in the Builder, expand the Entities Sine Wave and Associated Data to see the Attributes of each and compare with the code above.
Note that the types of the Attributes are grayed out and not editable. This is specified in the adapter class by overriding the following method:
[java,N]
public boolean allowAttrTypeOverride() {
	return false;
}
List Associations for the adapter
Now that the Entities and their Attributes have been defined, the adapter needs to provide information about Associations between Entities. This is done through the findAssociationDefinitions method. This method returns the set of Associations from the Entity specified by entityDef to any of the Entity names in the Collection entityNames. For the demo adapter, there is one association from Sine Wave to a set of data records in Associated Data. The name of the association will appear as a new attribute of the "from" Entity, and the association is made between the Attribute named in the setKeyFrom method to the Entity with the Namespace specified in setLinkedNamespace with the name from the setKeyTo method. The Association can be specified as one-to-one or one-to-many.
[java,N]
public Collection<AssociationDef> findAssociationDefinitions(
		Entity entityDef, Collection<String> entityNames)
		throws AdapterLoadException {
List<AssociationDef> associations = new ArrayList<AssociationDef>();
	if (entityDef.getEntityName().equals(ENTITY_SINE_WAVE)) {
		if (entityNames.contains(ENTITY_ASSOCIATED_DATA)) {
			AssociationDef thisAssociation = new AssociationDef();
			thisAssociation.setName(ENTITY_ASSOCIATED_DATA);
			thisAssociation.setKeyFrom(ATTR_KEY);
			thisAssociation.setLinkedNamespace(getDefinition().getNamespace() + Namespace.SEPARATOR + ENTITY_ASSOCIATED_DATA);
			thisAssociation.setKeyTo(ATTR_WAVE_KEY);
			thisAssociation.setRelationshipAsOneToMany(true);
			associations.add(thisAssociation);
}
} else {
}
	return associations;
}
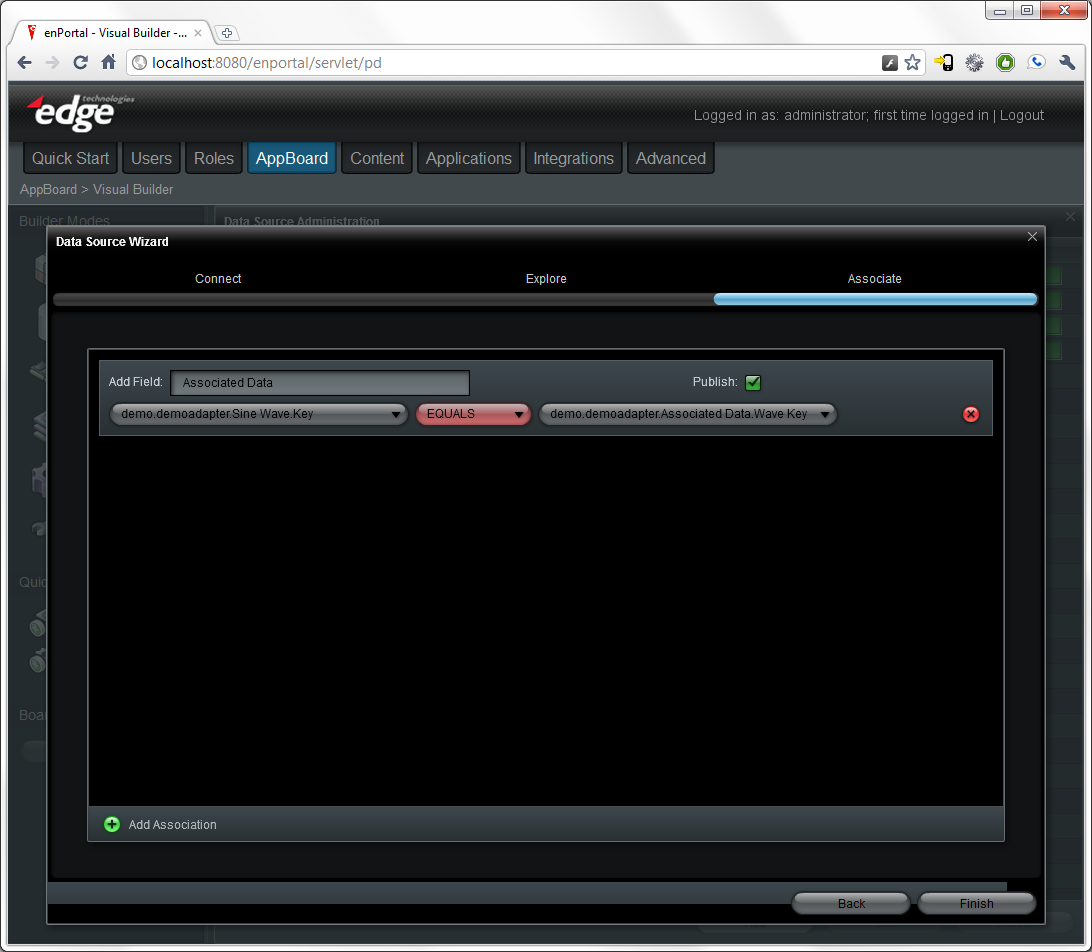
Selecting Next in the wizard will continue to the Association(s) defined for the new Data Source, and the following screen shows the Association between the Key Attribute of Sine Wave and the Wave Key Attribute of Associated Data:
Retrieve data for the adapter
Once all the Entities, Attributes, and Associations for the new Data Source have been exposed through the Data Adapter, the adapter must implement one or more methods for providing the data. The easiest approach, and often sufficient for data sets that are not big (e.g. more than 10,000 records), is to fully cache all data from the source. For this approach, the single method fetchRecords must be implemented, which returns a full set of all data for a specified Entity.
The data is produced as a collection of GenericRecords, which store the Entity for the record and a map of data, where the keys are the names of Attributes and the values are Java Objects (typically String, Date, or Numeric types).
[java,N]
public void fetchRecords(ServiceRequestFacade request,
	ServiceResponseFacade response) throws Exception
{
	String entityName = request.getEntity().getEntityName();
List<GenericRecord> recordList = new ArrayList<GenericRecord>();
	int duration = getSettingAsInt(SETTING_DURATION, 600);
	int wavePeriod = getSettingAsInt(SETTING_WAVE_PERIOD, 60);
	int waveAmp = getSettingAsInt(SETTING_WAVE_AMPLITUDE, 50);
	int waveOffset = getSettingAsInt(SETTING_WAVE_OFFSET, 50);
	int dataInterval = getSettingAsInt(SETTING_DATA_INTERVAL, 10);
int assocOffset = getSettingAsInt(SETTING_ASSOCIATED_DATA_POINTS, 3);
	long currentMs = System.currentTimeMillis();
	long currentSec = currentMs/1000;
long startSec = ((currentSec - duration) / dataInterval) * dataInterval; // align to interval
	boolean isWaveEntity = entityName.equals(ENTITY_SINE_WAVE);
	for (long timeSec = startSec; timeSec <= currentSec; timeSec += dataInterval) {
		double phase = ((double) (timeSec % wavePeriod)) / ((double) wavePeriod) * 2.0d * Math.PI;
		int value = (int) (Math.sin(phase) * waveAmp + waveOffset);
		Date timestamp = new Date(timeSec * 1000);
		if (isWaveEntity) {
			Map<String,Object> attributes = new HashMap<String, Object>();
			attributes.put(ATTR_KEY, Long.toHexString(timeSec));
			attributes.put(ATTR_TIMESTAMP, timestamp);
			attributes.put(ATTR_VALUE, value);
			GenericRecord record = new GenericRecord(request.getEntity(), attributes);
			recordList.add(record);
		} else {
			for (int i = -assocOffset; i <= assocOffset; i++) {
				Map<String,Object> attributes = new HashMap<String, Object>();
				attributes.put(ATTR_TIMESTAMP_OFFSET, Long.toString(timeSec) + ':' + Integer.toString(i));
				attributes.put(ATTR_WAVE_KEY, Long.toHexString(timeSec));
				attributes.put(ATTR_TIMESTAMP, timestamp);
				attributes.put(ATTR_OFFSET, i);
				attributes.put(ATTR_DESCRIPTION, "Offset " + i + " from value " + value + " is " + (value + i));
				GenericRecord record = new GenericRecord(request.getEntity(), attributes);
				recordList.add(record);
			}
		}
	}
	response.addGenericRecords(recordList);
}
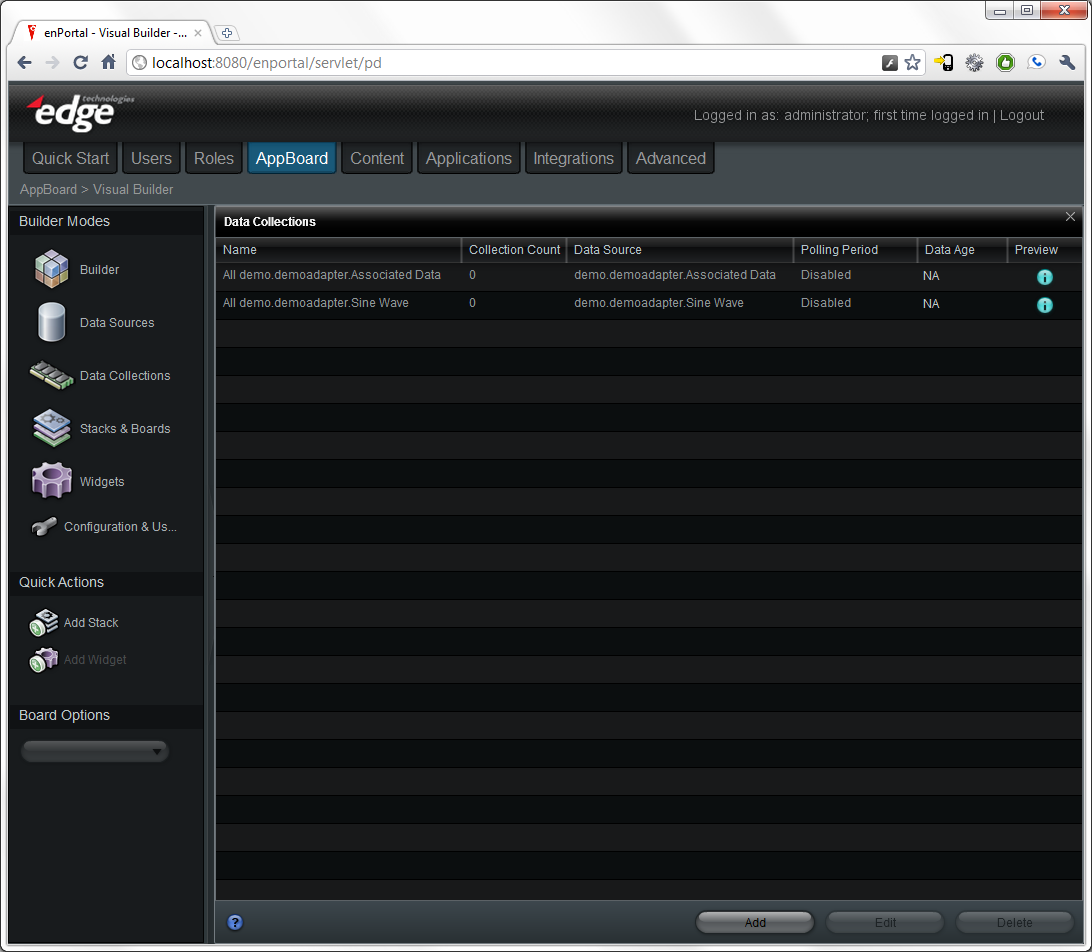
The Entities exposed through the new Data Source created in the Builder using the DemoDataAdapter are exposed as Data Collections. Data Collections are the client-side representation of a single Entity, although multiple Data Collections may be backed by the same server-side Entity. This is needed as each client-side Data Collection may be filtered, and filtered and unfiltered views of data from a single Entity may be desired.
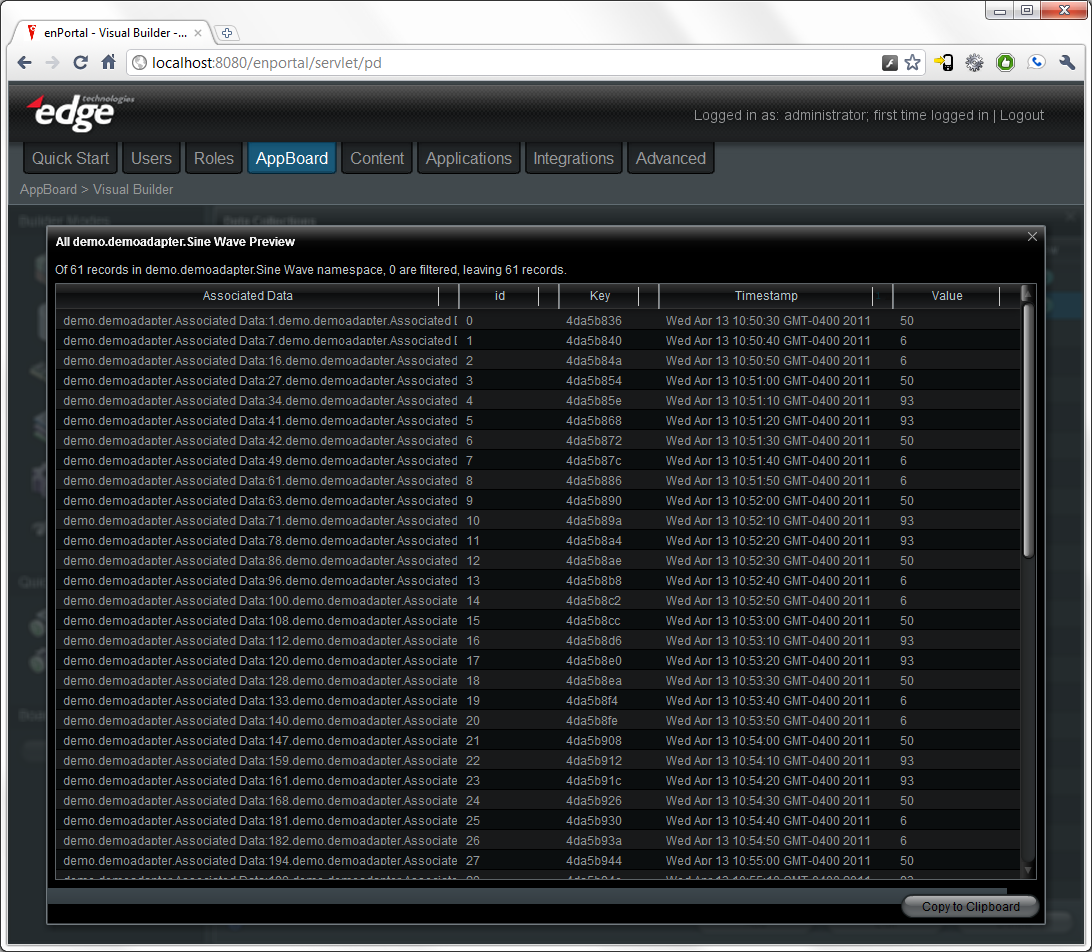
To see the data returned, click the icon under Preview for the Sine Wave Entity. Along with the defined Attributes of Key, Timestamp, and Value, notice the additional columns showing the generated id and the Associated Data Association.
Demo AppBoard Stack
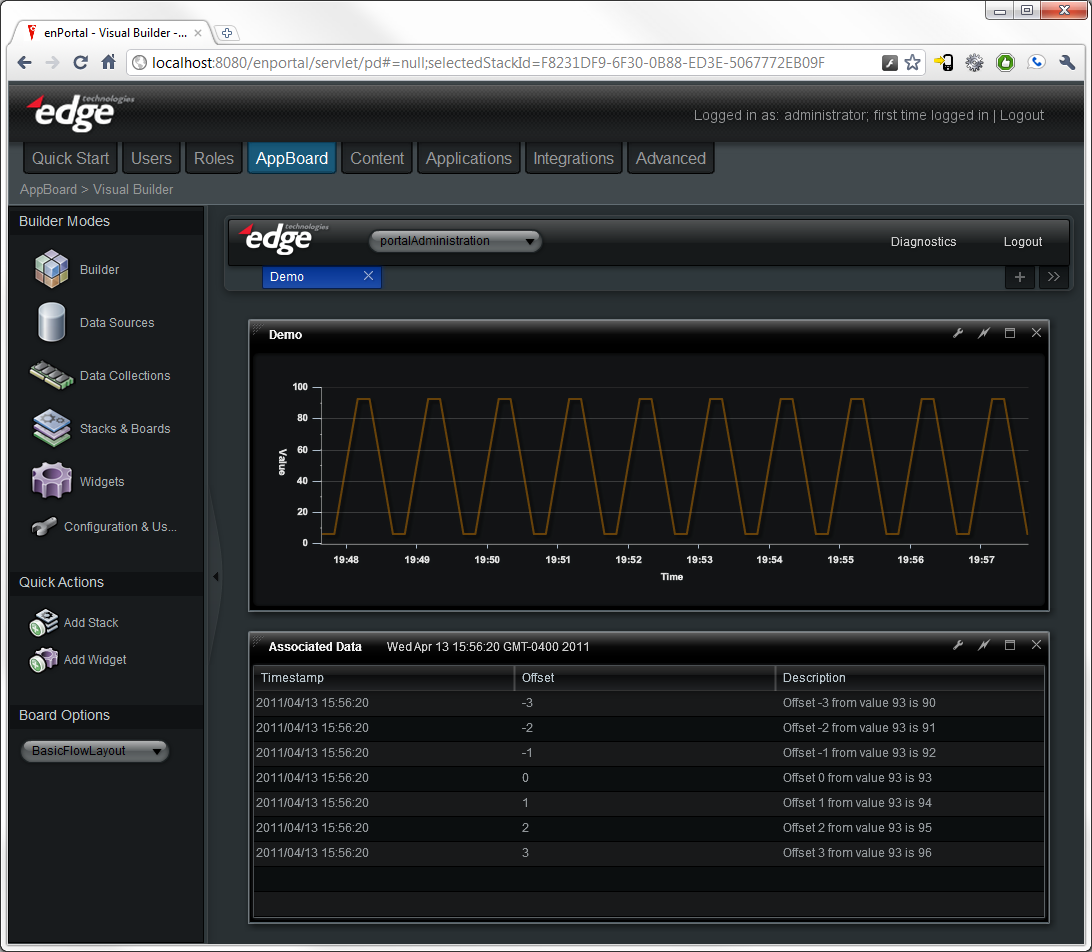
Below is a Stack created with one Widget showing a Line Chart of the Sine Wave Data Collection and another showing a Table of the Associated Data Data Collection. The Associated Data is filtered via a selection action on the Sine Wave chart.
Completion and Validation
Once the above steps are completed, the adapter needs to be formalized. The adapter developer must go through the Adapter Checklist to confirm that all activities are complete.
Advanced Adapter Concepts
This example has demonstrated to use of fetchRecords() to retrieve and replace all records for an entity on update. For many uses, this is adequate and the most expedient solution. However, for some adapters with large data sets, more efficient data retrieval techniques need to be employed. Examples can be found on the AppBoard Advanced Data Adapter page.
