Appboard/2.4/builder/widgets/actions/set widget selection: Difference between revisions
imported>Mike.berman No edit summary |
imported>Cmace (action filtering based on data source, not data collection) |
||
| (4 intermediate revisions by 2 users not shown) | |||
| Line 1: | Line 1: | ||
{{DISPLAYTITLE: | {{DISPLAYTITLE:Set Widget Selection}} | ||
[[Category:AppBoard 2.4]] | |||
The "Set Widget Selection" Action controls what item is selected in a Widget based on an event or selection in another Widget. | The "Set Widget Selection" Action controls what item is selected in a Widget based on an event or selection in another Widget. | ||
| Line 13: | Line 14: | ||
# Follow the instructions above to create the Action in the <b>Widget Actions</b> panel. | # Follow the instructions above to create the Action in the <b>Widget Actions</b> panel. | ||
# <b>Name</b>: Enter a name for this Action. For convenience, a default name is provided | # <b>Name</b>: Enter a name for this Action. For convenience, a default name is provided. The Name is not used anywhere else in AppBoard, and only displayed on this configuration page. | ||
# <b>On selection of</b>: | # <b>On selection of</b>: | ||
## Select "any" or "specific" for the type of data selection by the User that will trigger the Action. When selecting "specific", perform the following additional steps: | ## Select "any" or "specific" for the type of data selection by the User that will trigger the Action. When selecting "specific", perform the following additional steps: | ||
| Line 19: | Line 20: | ||
### Click <b>Add Rule</b> to create one or more rules that indicate what data should trigger the Action, when selected. | ### Click <b>Add Rule</b> to create one or more rules that indicate what data should trigger the Action, when selected. | ||
### Click <b>Close</b> to save the Filter settings. | ### Click <b>Close</b> to save the Filter settings. | ||
## Select the Data Source name. When the Widget is run, selection of data in this Data Source will trigger the Action. | |||
# Under <b>Set selection on</b>, select the name of the target Widget in which you want to set the selected value. | # Under <b>Set selection on</b>, select the name of the target Widget in which you want to set the selected value. | ||
# Choose one of the options for how the selection should be determined: | # Choose one of the options for how the selection should be determined: | ||
Latest revision as of 18:36, 1 May 2014
The "Set Widget Selection" Action controls what item is selected in a Widget based on an event or selection in another Widget.
How To Create a Set Widget Selection Action
For instructions on adding an Action to a Widget, see the general instructions in How To Create an Action in a Widget.
How To Configure a Set Widget Selection Action
Perform the following steps to configure a "Set Widget Selection" Action:
- Follow the instructions above to create the Action in the Widget Actions panel.
- Name: Enter a name for this Action. For convenience, a default name is provided. The Name is not used anywhere else in AppBoard, and only displayed on this configuration page.
- On selection of:
- Select "any" or "specific" for the type of data selection by the User that will trigger the Action. When selecting "specific", perform the following additional steps:
- Click the Filter button. The Filter Editor is displayed.
- Click Add Rule to create one or more rules that indicate what data should trigger the Action, when selected.
- Click Close to save the Filter settings.
- Select the Data Source name. When the Widget is run, selection of data in this Data Source will trigger the Action.
- Select "any" or "specific" for the type of data selection by the User that will trigger the Action. When selecting "specific", perform the following additional steps:
- Under Set selection on, select the name of the target Widget in which you want to set the selected value.
- Choose one of the options for how the selection should be determined:
- as no selection: Set the Widget to remove any previous selection so that nothing in the Widget will be selected.
- from event: Select the name of the property on the data used to trigger this event.
- from widget's last selection: Use the last selected item in a source Widget to determine what to select in the target Widget.
- Check the box next to Trigger actions on target widget if you want any Actions associated with clicking on the target Widget to be invoked, as if the User had clicked the selected item in the target Widget.
- Click Close to exit the Widget Wizard and test the Action.
Sample Use Case
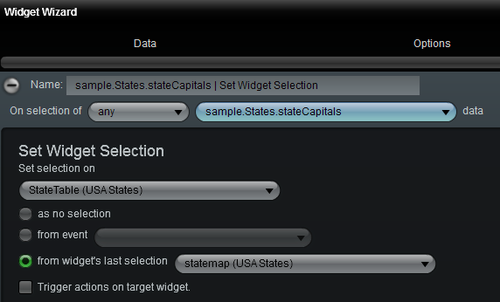
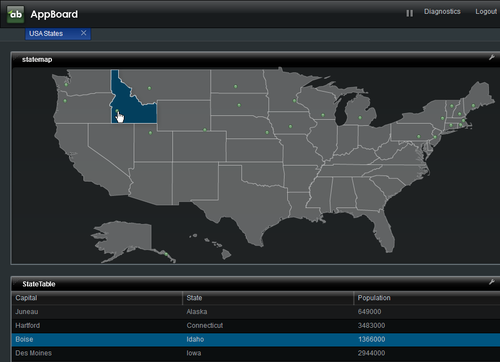
Suppose you have two Widgets, a Map and a table. You want to select (highlight) the row in the table that corresponds to the node that is clicked in the map. Perform the following steps to configure the Set Widget Selection Action:
- In the Map Widget, click the lightning bolt to go to the Actions panel in the Widget Wizard.
- Click Add Event Action and select the Set Widget Selection Action.
- Under Set selection on, select the name of the Table Widget.
- Choose from widget's last selection and select the name of the Map Widget from the list.
Perform the steps outlined above to create an Action configuration similar to what is presented in the following image:
When the User clicks a node in the Map Widget, the corresponding row in the Table Widget is selected:


