Enportal/5.6/admin/system administration/System Settings: Difference between revisions
imported>Jason.nicholls |
imported>Jason.nicholls |
||
| Line 18: | Line 18: | ||
* <tt>edgeLight_css3</tt>: new Light login page themed using CSS for easier customization | * <tt>edgeLight_css3</tt>: new Light login page themed using CSS for easier customization | ||
* <tt>edgeFlat</tt>: new Flat login page themed using CSS for easier customization | * <tt>edgeFlat</tt>: new Flat login page themed using CSS for easier customization | ||
* <tt>edgeMarketing</tt>: example promotional login page | |||
{{Note|The login page can be changed for individual domains, by specifying a custom login page per [[enportal/5.6/admin/user_administration/enPortal_provisioning#Domains|domain]]. The login page specified for a domain takes precedence over the system setting.}} | {{Note|The login page can be changed for individual domains, by specifying a custom login page per [[enportal/5.6/admin/user_administration/enPortal_provisioning#Domains|domain]]. The login page specified for a domain takes precedence over the system setting.}} | ||
Latest revision as of 18:41, 3 August 2015
The system is installed with pre-defined settings for both login page and look and feel (LAF) and without a password policy in place. Through the Advanced Tab -> System Settings, administrators can assign a system login page and system LAF that will override the default out of the box settings as well as creating a system password policy.
System Login Page
The system login page is the page that all users will see when they first access the system.
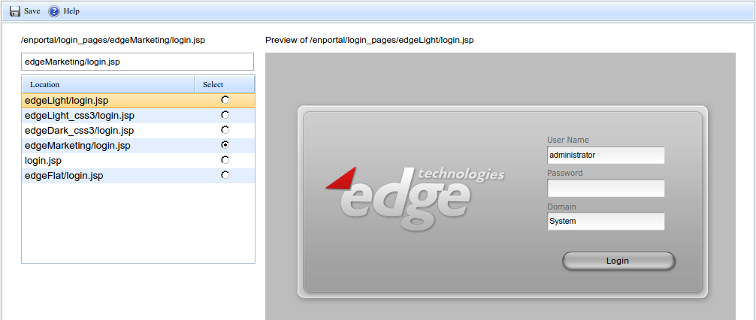
Login pages must exist on the enPortal server in the [INSTALL_HOME]/server/webapps/enportal/login_pages directory. Take a look in this directory to see the available options included with a default enPortal install:
- (no sub-directory): classic Edge Dark login page
- edgeLight: classic Edge Light login page
- edgeDark_css3: new Dark login page themed using CSS for easier customization
- edgeLight_css3: new Light login page themed using CSS for easier customization
- edgeFlat: new Flat login page themed using CSS for easier customization
- edgeMarketing: example promotional login page
Assigning a System Login Page
Perform the following steps to assign a system login page:
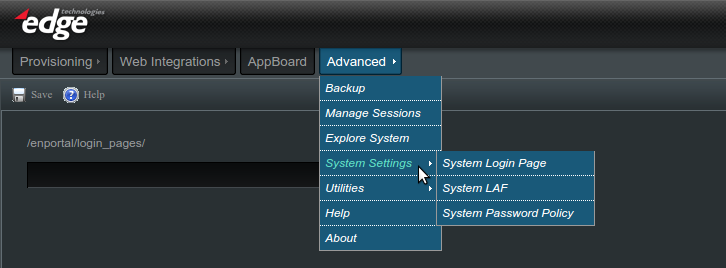
- Mouse over the Advanced tab and then System Settings and click on System Login Page.
- From the table click within the Location column to preview a login page
- To change the current selection use the Select column.
- Click the Save button.
- Logout of the portal and confirm that the correct login page is displayed.
Modifying Login Pages
Modifying the login page may be as minimal as changing the logo, or adjusting some of the theming, or completely writing everything custom. In all cases the existing shipped pages and resources should serve as a starting template. The recommended approach is to:
- Choose one of the existing login pages to start with, it's best to use the CSS-based pages if the goal is to simply change the logo and look'n'feel.
- Make a copy of the login page sub-directory with all it's files and sub-directories into a new directory, for example: [INSTALL_HOME]/server/webapps/enportal/login_pages/customLoginPage
- Make changes only to this new copy as needed.
- Update the system to use the new login page (see previous section)
- Except for the system shipped login pages, all other sub-directories under login_pages are automatically included in backup archives.
To test make sure to log out of enPortal, clear your browser cache, and reload the login page.
Custom Login Page Examples
For more information and examples on modifying or creating completely custom login pages refer to the Custom Login Pages documentation.
Look and Feel
You can specify a default system look and feel (LAF) so that the appropriate LAF is displayed when a user logs in.
A default LAF can also be assigned to a role, domain, or user.
Order of Precedence
The order of precedence for LAF assignments is as follows:
This means that when an user logs in, the system determines if an LAF has been assigned to the role, then it displays the the LAF assigned to the role. If there is no LAF assigned to the role, then it displays the LAF assigned to the user, and if there is no assignment, it checks the domain and then the system.
Assigning a System Look and Feel
Perform the following steps to assign a system look and feel (LAF).
- Log in to enPortal as an administrator. (Non-administrative users are not allowed to set the System LAF.)
- Mouse over the Advanced tab and then System Settings and click on System LAF.
- Select the desired LAF from the drop-down box.
- Click the Save button.
- Refresh the browser page and confirm that the correct LAF is displayed assuming no LAF is assigned to administrator user, role, or domain directly.
With deployments that have many tab menus with sub-menus and content provisioned it can be useful for end-users to see the current selected channel and it's hierarchy in the form of breadcrumbs. The default enPortal look and feel supports this feature however it is disabled by default. To enable:
- Edit or create [INSTALL_HOME]/server/webapps/enportal/WEB-INF/config/custom.properties
- Add the following on a separate line and save the file:
- provisioning.showBreadCrumb=true
- restart enPortal.
System Password Policy
System Password Policy
The setting in the system password policy will affect all users in the portal system and in external LDAP. When setting the policy for LDAP users, it is strongly recommended that the system policy matches that of LDAP because most of the LDAPs do not give good error messages when user's password failed its policy.
Assigning a System Password Policy
Perform the following steps to assign a system password policy.
- Log in to enPortal as an administrator.
- Mouse over the Advanced tab and then System Settings and click on System Password Policy.
- Make the desired changes in the three sections: Password, Syntax, and Lockout
- Click the Save button.
- Confirm that the correct policy is applied by changing a test user's password.
LDAP Authentication
When using external authentication via LDAP the password policy should mirror the policy defined for the LDAP system. It may be more applicable to apply this policy just to the LDAP Domain.
Refer to the LDAP Configuration documentation for more information on configuring LDAP including supported features depending on the LDAP server.


