Appboard/2.4/builder/widgets/actions/show actions menu: Difference between revisions
imported>Jason.nicholls No edit summary |
imported>Cmace (action filtering based on data source, not data collection) |
||
| Line 21: | Line 21: | ||
### Click <b>Add Rule</b> to create one or more rules that indicate what data should trigger the Action, when selected. | ### Click <b>Add Rule</b> to create one or more rules that indicate what data should trigger the Action, when selected. | ||
### Click <b>Close</b> to save the Filter settings. | ### Click <b>Close</b> to save the Filter settings. | ||
## Select the Data | ## Select the Data Source name. When the Widget is run, selection of data in this Data Source will trigger the Action. | ||
# Click the <b>Edit Actions Menu</b> button to open the <b>Edit Actions Menu</b> window. | # Click the <b>Edit Actions Menu</b> button to open the <b>Edit Actions Menu</b> window. | ||
# Click <b>Add Action to Menu</b> and select an Action type to create the first option to be provided in the Actions Menu. | # Click <b>Add Action to Menu</b> and select an Action type to create the first option to be provided in the Actions Menu. | ||
Latest revision as of 18:42, 1 May 2014
The "Show Actions Menu" Action provides a list of Actions for the User to choose from. The list of available Actions is pre-configured by the visualization designer, and each selection can invoke one Action or a series of Actions. This Action is similar to the Bundled Actions Action. The difference is that "Bundled Actions" has a single set of Actions that will execute when an item is clicked, while "Show Actions Menu" provides a visual list of two or more Actions for the User to choose from.
How To Create a Show Actions Menu Action
For instructions on adding an Action to a Widget, see the general instructions in How To Create an Action in a Widget.
How To Configure a Show Actions Menu Action
Perform the following steps to configure a "Show Actions Menu" Action:
- Follow the instructions above to create the Action in the Widget Actions panel.
- Name: Enter a name for this Action. For convenience, a default name is provided. The Name is not used anywhere else in AppBoard, and only displayed on this configuration page.
- On selection of:
- Select "any" or "specific" for the type of data selection by the User that will trigger the Action. When selecting "specific", perform the following additional steps:
- Click the Filter button. The Filter Editor is displayed.
- Click Add Rule to create one or more rules that indicate what data should trigger the Action, when selected.
- Click Close to save the Filter settings.
- Select the Data Source name. When the Widget is run, selection of data in this Data Source will trigger the Action.
- Select "any" or "specific" for the type of data selection by the User that will trigger the Action. When selecting "specific", perform the following additional steps:
- Click the Edit Actions Menu button to open the Edit Actions Menu window.
- Click Add Action to Menu and select an Action type to create the first option to be provided in the Actions Menu.
- Under Menu label for action, enter the label to be displayed to the User for this Action (or group of Actions) in the Actions Menu.
- [Optional] If you want to have multiple Actions for this menu choice, click Add Action to implement additional Actions that will be invoked for this menu option.
- Click Add Action to Menu and select an Action type to create the first option to be provided in the Actions Menu.
- Under Menu label for action, enter the label to be displayed to the User for this second Action (or group of Actions) in the Actions Menu.
- [Optional] Again, click Add Action to implement additional Actions that will be invoked for this menu option.
- Continue adding options until the list contains all of the options to be provided to the User.
- Click Close to return to the Widget Wizard.
- Click Close.
- Click in the Widget and verify that the desired labels are shown in the Action Menu.
- Test each of the options to confirm that it implements the expected Action or group of Actions.
Nested Show Actions Menus
The "Show Actions Menu" Action can be used to create nested menus of Actions. To do so, configure one of the Actions in the menu to be another "Show Actions Menu" Action. This menu can itself have another "Show Actions Menu" Action as one of the options in the list. This can be repeated and nested as deeply as desired by the Board designer.
Sample Use Case
Suppose you want to give the User two different options when clicking a point on a Map Widget:
- Show the Record Details Window for the node on the map
- Drill down to another Board with a filtered Data Collection
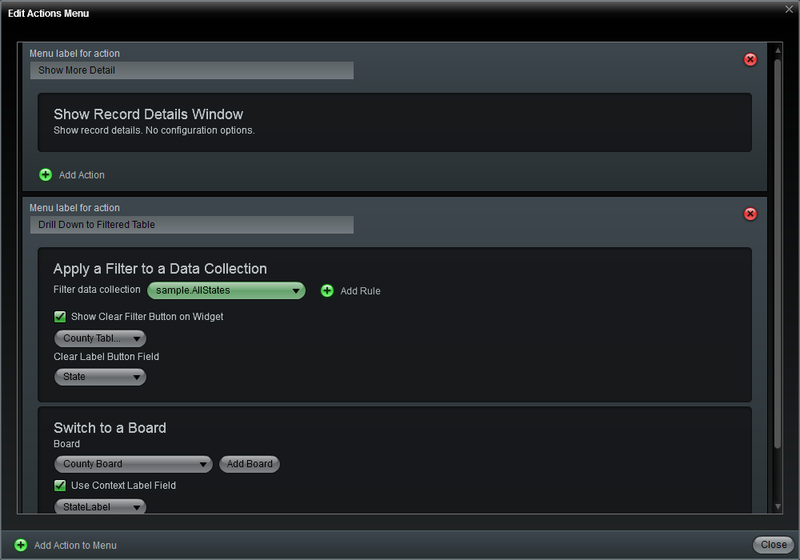
Perform the steps outlined above to create an Actions Menu similar to what is presented in the following image:
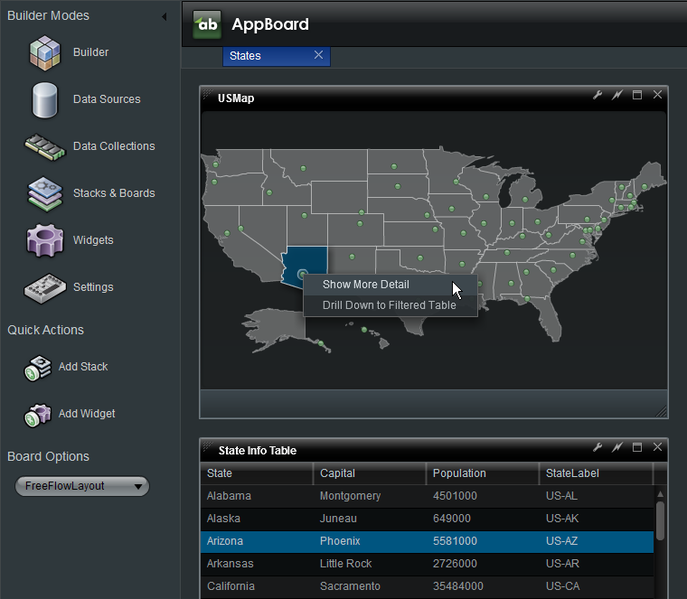
When the User clicks in the Map Widget, he will receive the following menu of Actions:


