Enportal/5.6/web integrations/pim import and export
Product Integration Modules (PIMs) offer proxied views of web-based applications combined with user authentication, Single Sign-On, secure multi-tenancy, and HMTL content manipulation. They are distributed as jar files and contain customizable rules files that manage the behavior of the specific application in enPortal.
PIM Import
The Web Integrations -> PIM Import administration page is used to load packaged Product Integration Modules (PIMs) into the system. This should only need to happen once as future backups will include all installed PIMs.
PIMs are distributed as a single .jar file which includes all necessary components. Typically this includes:
- Authentication handlers (resolvers)
- Proxy Classes (channel types)
- Any other miscellaneous CRS handlers
- A "sample" Target configured with instances of the various channel types.
- Any other supporting material.
The import process takes the .jar file, overlays this into the server installation, then registers the new components by processing an XML description that's included in the package.
Edge Technologies provides and maintains a broad set of PIMs but custom PIMs can also be developed and packaged this way. For a complete list of PIMs available from Edge refer to the Integrations part of the documentation.
Importing a PIM
To load a new PIM into the system follow the steps below. This assumes you already have the PIM .jar file available.
- Navigate to the Web Integrations -> PIM Import administration page
- Click the Choose File button and locate the PIM .jar file on your system.
- Click the Start button.
- That's it - a summary screen will show the contents of the PIM that were installed.
PIM Export
Since the original content of the PIM may be modified in some cases, it is often helpful to export the currently installed contents of the PIM back to a jar file. This could be used for sending a PIM to Technical Support for troubleshooting, or for migrating an updated PIM to another system.
Exporting a PIM
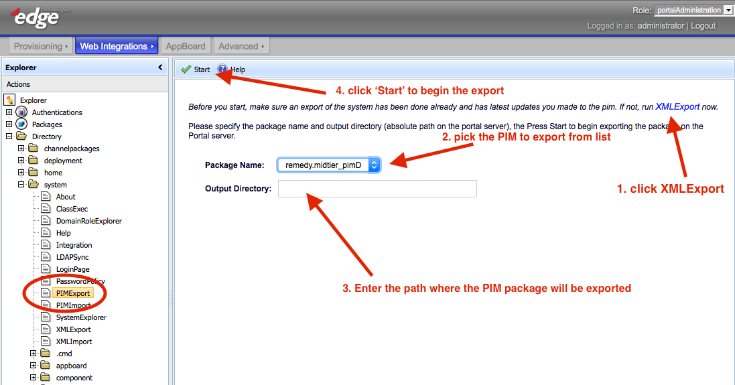
Perform the following steps to export a PIM:
- Navigate to the Web Integrations administration page.
- Locate the PIMExport channel under the Directory / system folder.
- Click the XMLExport link to run the XML Export utility. Observe the message "XML Export Finished".
- Next to Package Name, select the PIM to export from the list.
- Next to Output Directory, enter the path on the file server where the PIM package should be exported.
- Example: C:\enportal
- Click Start to complete the export. Observe the message "Finished. Please examine files in [path_name]/root directory.".
The image below provides a quick overview of the export steps. If Technical Support requests a PIM export, please follow the above steps and submit the resulting file.


