Appboard/2.4/builder/data source failover
The option to provide failover for SQL Data Sources is available in AppBoard versions 2.4 or higher. This page provides instructions for configuring this component in the AppBoard Builder.
Overview
AppBoard designers and administrators want to configure the system to be resilient and provide fresh data, even in cases where connectivity to a Data Source may be lost. Failover allows the system to check if a Data Source is no longer accessible, and if so, to switch over to a backup Data Source.
To configure failover for a Data Source, follow the instructions on this page to enable failover on the Data Source configuration panel.
Pre-Requisites
Before implementing failover on a Data Source, the AppBoard administrator must confirm the following:
- The back-end databases must be configured such that the various available servers present a redundant and consistent view of the data (the same required tables must be available, the table structure should be consistent, and so on).
- The back-end databases must be online and the AppBoard server must have permanent connectivity to all of the database servers.
- The authentication credentials must be known (and ideally consistent) between all the database instances.
Failover Configuration Panel
Perform the following steps to enable and display the failover configuration panel:
- Log in to AppBoard as an administrator.
- Create or edit a Data Source that supports failover.
- Go to the "Explore" configuration screen.
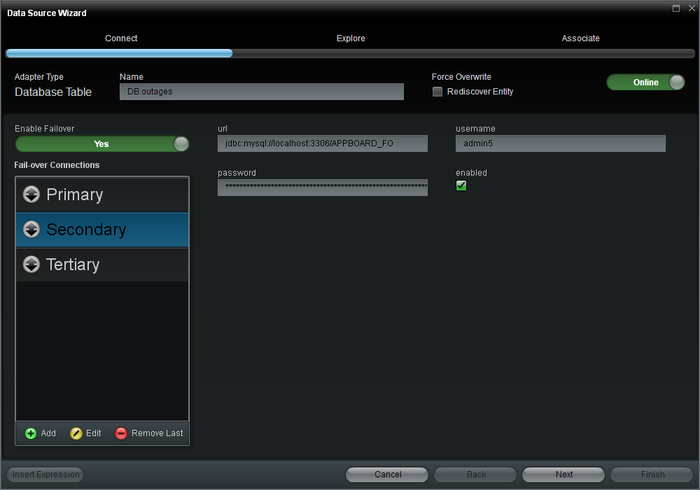
- Click the "Enable Failover" toggle switch to set it to "Yes". The "Fail-over Connections" panel is displayed.
Configuring Failover
Perform the following steps to configure failover for a Data Source:
- Enable failover by following the instructions detailed above under "Failover Configuration Panel".
- Observe that the "Primary" connection is selected in the "Fail-over Connections" panel. A question mark icon indicates that AppBoard has not yet validated connectivity to the connection. The icon will be updated later to indicate updated connectivity status.
- On the main screen, enter the URL and all of the other basic connection and configuration values for the Primary connection just as you would for any standard Data Source.
- Click "Add" in the "Fail-over Connections" panel. A "Secondary" connection label will be added to the list of "Fail-over Connections".
- Enter the URL, Username, and Password for the data source that AppBoard should switch to if connectivity is lost to the Primary data source. Note that all of the other configuration settings are assumed to be the same as what you entered for the Primary connection.
- [optional] Click "Add". A "Tertiary" connection label will be added to the list of "Fail-over Connections".
- [optional] Enter the URL, Username, and Password for the data source that AppBoard should switch to if connectivity is lost to both the Primary and Secondary data sources. Note that all of the other configuration settings are set to be the same as what you entered for the Primary connection.
- [optional] Change the names of the connections by selecting each connection and clicking "Edit".
One of the following status icons will be displayed by AppBoard for each data source to indicate the current status of that connection:
Testing Failover
Perform the following steps to test your failover configuration:
- Make sure your AppBoard server has connectivity to all of the data sources to be tested and confirm that they are all online.
- Create individual Data Sources that access each of your Primary, Secondary, and [optional] Tertiary data sources. Identify or create a small distinction in the source data that will indicate which data source is being accessed when the data is viewed in a Data Collection.
- Validate that AppBoard can successfully connect to each of the data sources independently, by viewing data in each Data Collection and confirming that it matches the data in each raw data source.
- Configure failover as detailed above.
- Validate that the Data Collection is showing the data from the Primary data source.
- Disconnect the Primary data source from AppBoard.
- Validate that the Data Collection fails over to show the data from the Secondary data source. Note: you may need to wait for polling/caching settings to expire before the next update shows the change in the data.
- Reconnect AppBoard to the Primary data source and disconnect the Secondary data source from AppBoard.
- Validate that the Data Collection fails back to show the data from the Primary data source. Note: you may need to wait for polling/caching settings to expire before the next update shows the change in the data.
- [optional] Disconnect the Primary and Secondary data sources from AppBoard.
- [optional] Validate that the Data Collection fails over to show the data from the Tertiary data source. Note: you may need to wait for polling/caching settings to expire before the next update shows the change in the data.


