Appboard/old/launch enportal channel
In this section, we will provide a tutorial example for launching a contextual, generic enPortal channel from an AppBoard widget. Below are steps that show how to implement this cross communication between the enPortal channel and AppBoard widget.
In this example, we will use the state capital data included with AppBoard, and a Google Map (http://maps.google.com) to illustrate the steps to accomplish this.
Identify the relationship and interaction between components
First we must define what the source and target components will be for the widget/channel interaction.
For example, we would like to launch a proximity area about a US State capital when a user clicks on an entry of US State capital data. In this case, it can be implemented as a click action on a row of a Table Widget to launch a URL in a Web Page Widget.
Create the target component
Perform the following steps to create an enPortal channel that accepts the necessary input parameters:
- Log in to enPortal as an administrator.
- Select the Integrations tab. The Integrations Explorer panel is displayed.
- Right-click on the Directory folder and select New Channel.
- For the Channel Name, enter Google Map.
- For the Channel Type, select "Web/Generic URL".
- For the Type of Web/Generic Channel, select "Proxy".
- Click Next.
- Set Access Control to "AllowAll".
- For the URL, enter http://maps.google.com/maps.
- Click Save
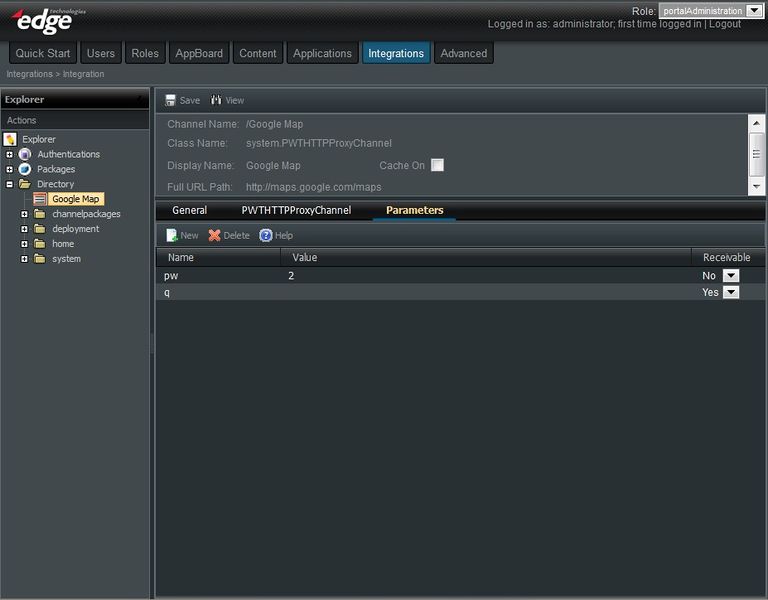
- Select the Parameters tab and create the following parameters:
- Variable q with Receivable flag set to "Yes".
- Variable pw with Value set to 2. This is a control flag to show the Google Map in a print mode.
- Click Save
Test the target component
Test the newly created channel by launching it independently in a browser. If it is working, then we will wrap this URL in a Web Widget and be placed in a board.
Assuming the hostname is "localhost" and the system is running on port 8080, the above Google Map channel can be accessed through enPortal as http://localhost:8080/enportal/servlet/pd/vdir/Google%20Map. Test this URL also with an input location, such as http://localhost:8080/enportal/servlet/pd/vdir/Google%20Map?q=39.161944,%20-75.526667. Verify that the locations with the indicated coordinates as displayed in the browser. If so, you can proceed to launch the URL from an AppBoard Widget.
Create the Source Components
Stack
Use AppBoard Builder to create a new Stack called "Map Interaction".
Basic Table Widget
Use the AppBoard Builder to create a data source named "sample.USA_States". The data for this will be the state capitals data file in {APPBOARD_HOME}/server/webapps/enportal/WEB-INF/data/pkg/appboard/test/stateCapitals.csv.
Then create a Table Widget called "State Table", which uses the data collection derived from the "sample.USA_States" data source. If you need assistance with creating the Data Source, Data Collection, or Table Widget, see the Getting Started Tutorial. Make sure this new Table Widget is placed on the "Map Interaction" Stack.
Web Page Widget
Use AppBoard Builder to create a Web Page Widget named "GMap" with its URL set to ${application.home}/data/pkg/appboard/test/stateCapitals.csv. This Widget will not display anything initially, but will be used in conjunction with an Action placed on the Table Widget that will launch this Widget with associated parameters for it to display. Make sure this new Web Page Widget is placed on the "Map Interaction" Stack.
Adjust the layout of the two Widgets, as desired.
Configure the Launch Action
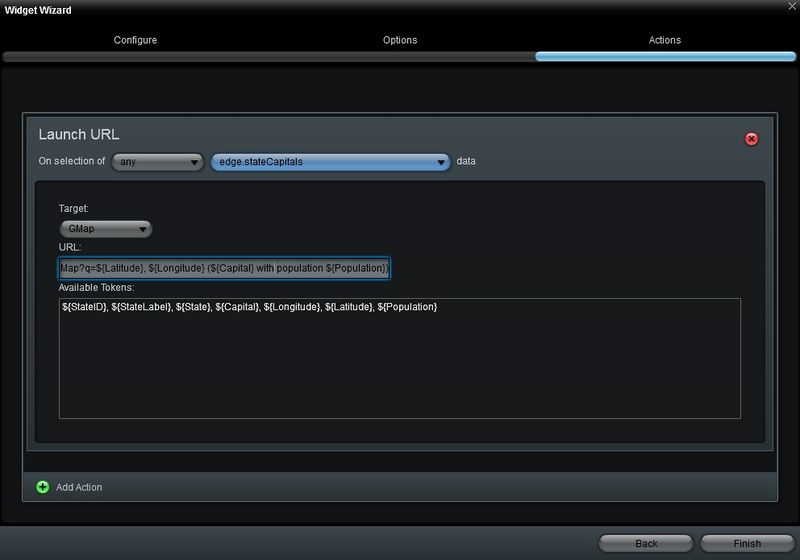
Using the Widget Wizard on the Table Widget, click Add Event Action to create a "Lauch URL" action. For the Target, choose the target component "GMap". In the URL field, enter
/enportal/servlet/pd/vdir/Google%20Map?q=${Latitude}, ${Longitude} (${Capital} with population ${Population})
Note: It is not necessary to specify the portal's header (protocol, host, port) in the URL.
Test the Result
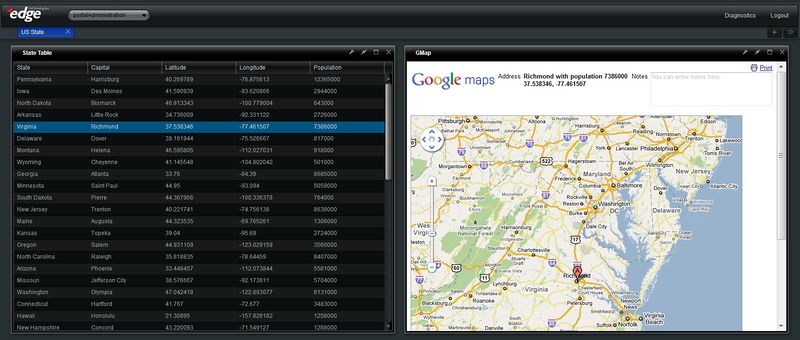
Click a row in the Table Widget. The Launch URL Action will pass the selected parameters into the Google Map channel and display the targeted coordinates in the map, along with the population in the Address field within the header of the map.
Below is a screen shot of the result:


