Appboard/2.5/builder/widgets/actions/bundled actions: Difference between revisions
imported>Jason.nicholls No edit summary |
imported>Jason.nicholls |
||
| (9 intermediate revisions by the same user not shown) | |||
| Line 3: | Line 3: | ||
== Overview == | == Overview == | ||
''Bundled Actions'' is a grouping mechanism so that multiple actions can be triggered based on the same action filter. The action filter applies to the bundle and all actions within the bundle are run when there is a match. Logically grouping actions into bundles is also useful for widgets that have a lot of actions to keep things organized. | |||
Bundling actions together also makes it possible to reuse action configuration on multiple widgets. While this is possible there are some caveats due to actions often being widget specific, data collection specific, or similar which means the actions may not work as expected when triggered from a different widget to the original. | |||
{{Warning|It is '''not''' recommended to reuse action bundles on different widgets. Instead copy the widget which will make a complete copy of the actions, including the action bundle. Ensure to edit the new widget and rename the action bundle as it will have the same name as the original which can be confusing.}} | |||
== | == Configuration == | ||
[[File:appboard-2.5-bundled-actions.png|frame|center|example Bundled Action configuration]] | |||
Refer to [[appboard/2.5/builder/widgets/actions#Managing_Actions|Managing Actions]] for general information on adding / editing / deleting actions. | |||
The following settings are available: | |||
* '''Select Action Bundle''': shows the currently selected bundle. Use the ''Add'' button to create a new action bundle, or the ''Edit'' button to edit the currently selected bundle. | |||
The screenshot above is from the ''Feature List'' widget in the Welcome content that ships with AppBoard. Most of the actions triggered by clicking a feature are grouped into bundles so this serves as a good example of how to use this feature. | |||
=== Editing Bundles === | |||
Editing an action bundle is very similar to the normal widget actions editor. | |||
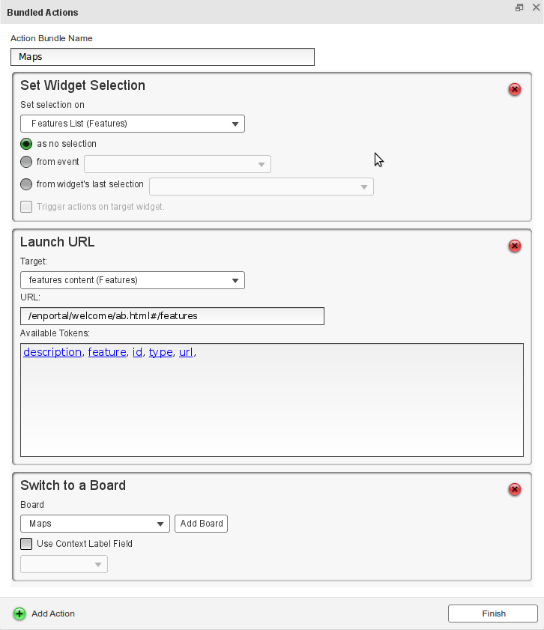
Use the ''Add Action'' button to add actions. Use the red <tt>X</tt> button on each action to remove the action. The main difference is that actions added into an action bundle do not have an action filter. Also make sure to set a unique '''Action Bundle Name''' to avoid confusion in systems with multiple action bundles. The screenshot below shows the bundle configuration from the same example as above. | |||
[[File:appboard-2.5-bundled-actions-editing.png|frame|center|example editing an action bundle]] | |||
[[ | |||
Latest revision as of 10:06, 24 October 2014
Overview
Bundled Actions is a grouping mechanism so that multiple actions can be triggered based on the same action filter. The action filter applies to the bundle and all actions within the bundle are run when there is a match. Logically grouping actions into bundles is also useful for widgets that have a lot of actions to keep things organized.
Bundling actions together also makes it possible to reuse action configuration on multiple widgets. While this is possible there are some caveats due to actions often being widget specific, data collection specific, or similar which means the actions may not work as expected when triggered from a different widget to the original.
Configuration
Refer to Managing Actions for general information on adding / editing / deleting actions.
The following settings are available:
- Select Action Bundle: shows the currently selected bundle. Use the Add button to create a new action bundle, or the Edit button to edit the currently selected bundle.
The screenshot above is from the Feature List widget in the Welcome content that ships with AppBoard. Most of the actions triggered by clicking a feature are grouped into bundles so this serves as a good example of how to use this feature.
Editing Bundles
Editing an action bundle is very similar to the normal widget actions editor.
Use the Add Action button to add actions. Use the red X button on each action to remove the action. The main difference is that actions added into an action bundle do not have an action filter. Also make sure to set a unique Action Bundle Name to avoid confusion in systems with multiple action bundles. The screenshot below shows the bundle configuration from the same example as above.


