Appboard/2.4/builder/widgets/web page: Difference between revisions
imported>Jason.nicholls |
imported>Jason.nicholls |
||
| (24 intermediate revisions by the same user not shown) | |||
| Line 12: | Line 12: | ||
* Include web pages or content served up by the AppBoard server itself. These could be static pages or CGI scripts. | * Include web pages or content served up by the AppBoard server itself. These could be static pages or CGI scripts. | ||
This page covers using and configuring the Web Page Widget. For more information on updating the content via action refer to the [[appboard/2.4/builder/widgets/actions/launch_url|Launch URL Action]] page. | |||
Other than managing the URL, interaction between the Web Page Widget and AppBoard is limited. To develop a more integrated experience allowing AppBoard and the Widget to communicate then refer to the [[appboard/2.4/builder/widgets/html_widget|HTML Widget]]. | |||
{{Note|When using the Web Page Widget be aware that accessing some websites or web applications may not work. This is due to the way these sites are expecting to interact with the browser, as the top-level window, and not in a frame. The typical symptoms are either a blank widget, or the site will take over the top-level window replacing AppBoard.<br/><br/> | |||
If content from sites incompatible with frames is required then enPortal can be used to handle this by proxying the site along with custom rules to deal with the issues when running in a frame.}} | |||
== Creating Web Widgets == | |||
For instructions on creating a Widget, see the general instructions in [[appboard/2.4/builder/widgets#Adding_Widgets|Adding Widgets]]. The <b>Web Page</b> Widget type is located under the <b>Web</b> category on the Widget selection screen. | For instructions on creating a Widget, see the general instructions in [[appboard/2.4/builder/widgets#Adding_Widgets|Adding Widgets]]. The <b>Web Page</b> Widget type is located under the <b>Web</b> category on the Widget selection screen. | ||
== Widget ''Home'' Control == | |||
[[File:appboard-2.4-web-widget-home.png|frame|center|Web Widget Home control]] | |||
In both the Builder and Viewer any Web Widgets feature a ''Home'' icon in the widget title bar. This forces the content displayed to revert to either: | |||
# the last configured URL via action | |||
# (if above doesn't apply) the widget configured URL | |||
When interacting with a Web Widget the user may navigate away from the original content and this feature just provides an easy way to get back. | |||
== Examples == | |||
== | === Simple External Source === | ||
This example configures a simple external URL: | |||
# Follow the instructions above to create the basic "Web Page" Widget. | # Follow the instructions above to create the basic "Web Page" Widget. | ||
# Enter the following information on the <b> | # Enter the following information on the <b>Visualization</b> tab: | ||
#* <b>URL</b>: | #* <b>URL</b>: <tt>http://www.edge-technologies.com</tt> | ||
# Click <b>Close</b> or <b>Next -> Finish</b> to save the changes. | |||
# | === Including enPortal Proxied Content === | ||
enPortal can provide from simple proxying of web content, so that a client retrieves the proxied data from the AppBoard server rather than directly, or more complex integrations using Product Integration Modules (PIMs). | |||
The pre-requisites for including enPortal proxied content are: | |||
# The ''Channel'' must exist, refer to the enPortal documentation on [[enportal/5.4/admin/user_administration/content_creation|Content Creation]] | |||
# The Channel should be provisioned to the roles of the end-users that will end up having access to the AppBoard ''Board'' where the Web Widget will be placed. Refer to the enPortal documentation on [[enportal/5.4/admin/user_administration/enPortal_provisioning#Content|Content Provisioning]]. | |||
# Obtain the enPortal URL needed for the Web Widget. The best way to get this is to: | |||
## in enPortal go to: ''Provisioning'' -> ''Content Management'' | |||
## find the desired Channel and select it | |||
## use the ''View'' button to launch a pop-up browser window. | |||
## copy the URL from this pop-up (excluding the <tt>http://server:port</tt> part) | |||
Putting it together: | |||
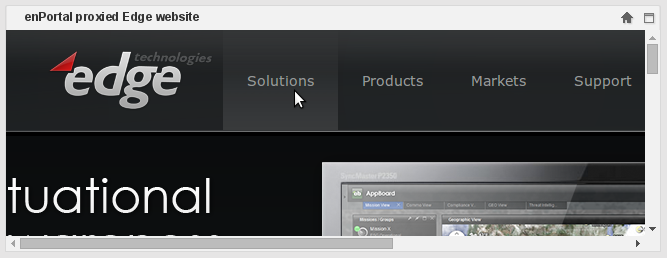
# Configure enPortal content as outlined above. In this example we created a folder called "Example" with a channel "Edge" that's a simple proxy channel of the Edge website. | |||
# Follow the instructions above to create the basic "Web Page" Widget. | |||
# Enter the following information on the <b>Visualization</b> tab (obtained from ''View''ing the channel): | |||
#* <b>URL</b>: <tt>/enportal/servlet/pd/vdir/deployment/Menu/Example/Edge</tt> | |||
# Click <b>Close</b> or <b>Next -> Finish</b> to save the changes. | |||
# Using the mouse, hovering over any links in the proxied content (depending on your browser) will show these links referencing the AppBoard server rather than the Edge website directly. | |||
[[File:appboard-2.4-web-widget-proxy.png|frame|center|Web Widget with enPortal proxied content.]] | |||
{{Note|In the ''portalAdministrator'' role this content will always be visible. However, if logged in as a regular user and the enPortal content has not been provisioned to the user's role then they will see a <tt>Portal Exception</tt> error message.}} | |||
{{Tip|Some enPortal Channels can take URL parameters. These can be explicitly set in the URL, or using tokens if using the Launch URL action.}} | |||
== | === Embedding a Twitter Timeline === | ||
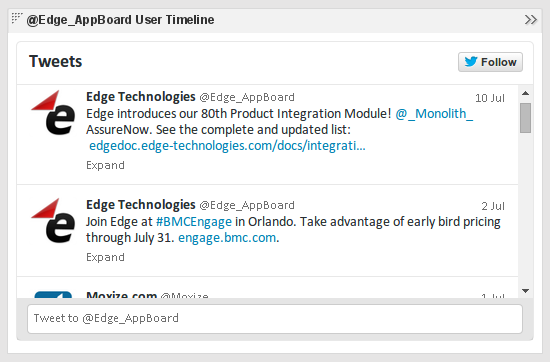
This example is a case of including a HTML page served up by the AppBoard server. The content of the HTML page is just a bare bones HTML document with the embedded code provided by Twitter using the ''User timeline'' widget (see https://twitter.com/settings/widgets - requires a Twitter account). | |||
This approach would be similar for many other services that offer embeddable content. | |||
[[File:appboard-2.4-web-widget-twitter.png|frame|center|Web Widget using local HTML page with embedded Twitter content.]] | |||
# Use Twitter Widgets (link above) to create the widget | |||
# Create a basic HTML page on the AppBoard server and include the code provided by Twitter. For example this could be stored: <tt>[INSTALL_HOME]/server/webapps/enportal/custom/edge_twitter.html</tt> | |||
# Now in the AppBoard Builder create a new Web Page widget and use the following URL: <tt>/enportal/custom/edge_twitter.html</tt> | |||
# Click <b>Close</b> or <b>Next -> Finish</b> to save the changes. | |||
Latest revision as of 12:22, 9 September 2014
Overview
The AppBoard Web Page Widget provides a way to include HTML content into an AppBoard dashboard. The URL for the widget can be configured with the widget and/or set via action which allows for user interaction to drive the content shown.
With the Web Page Widget you are able to:
- Include content from an external source by specifying an external URL. Please note that not all websites behave well in this context hence the functionality provided by enPortal.
- Include enPortal proxied content, providing the full capabilities of enPortal such as single sign-on (SSO), and the Content Retrieval System (CRS).
- Include web pages or content served up by the AppBoard server itself. These could be static pages or CGI scripts.
This page covers using and configuring the Web Page Widget. For more information on updating the content via action refer to the Launch URL Action page.
Other than managing the URL, interaction between the Web Page Widget and AppBoard is limited. To develop a more integrated experience allowing AppBoard and the Widget to communicate then refer to the HTML Widget.
Creating Web Widgets
For instructions on creating a Widget, see the general instructions in Adding Widgets. The Web Page Widget type is located under the Web category on the Widget selection screen.
Widget Home Control
In both the Builder and Viewer any Web Widgets feature a Home icon in the widget title bar. This forces the content displayed to revert to either:
- the last configured URL via action
- (if above doesn't apply) the widget configured URL
When interacting with a Web Widget the user may navigate away from the original content and this feature just provides an easy way to get back.
Examples
Simple External Source
This example configures a simple external URL:
- Follow the instructions above to create the basic "Web Page" Widget.
- Enter the following information on the Visualization tab:
- Click Close or Next -> Finish to save the changes.
Including enPortal Proxied Content
enPortal can provide from simple proxying of web content, so that a client retrieves the proxied data from the AppBoard server rather than directly, or more complex integrations using Product Integration Modules (PIMs).
The pre-requisites for including enPortal proxied content are:
- The Channel must exist, refer to the enPortal documentation on Content Creation
- The Channel should be provisioned to the roles of the end-users that will end up having access to the AppBoard Board where the Web Widget will be placed. Refer to the enPortal documentation on Content Provisioning.
- Obtain the enPortal URL needed for the Web Widget. The best way to get this is to:
- in enPortal go to: Provisioning -> Content Management
- find the desired Channel and select it
- use the View button to launch a pop-up browser window.
- copy the URL from this pop-up (excluding the http://server:port part)
Putting it together:
- Configure enPortal content as outlined above. In this example we created a folder called "Example" with a channel "Edge" that's a simple proxy channel of the Edge website.
- Follow the instructions above to create the basic "Web Page" Widget.
- Enter the following information on the Visualization tab (obtained from Viewing the channel):
- URL: /enportal/servlet/pd/vdir/deployment/Menu/Example/Edge
- Click Close or Next -> Finish to save the changes.
- Using the mouse, hovering over any links in the proxied content (depending on your browser) will show these links referencing the AppBoard server rather than the Edge website directly.
Embedding a Twitter Timeline
This example is a case of including a HTML page served up by the AppBoard server. The content of the HTML page is just a bare bones HTML document with the embedded code provided by Twitter using the User timeline widget (see https://twitter.com/settings/widgets - requires a Twitter account).
This approach would be similar for many other services that offer embeddable content.
- Use Twitter Widgets (link above) to create the widget
- Create a basic HTML page on the AppBoard server and include the code provided by Twitter. For example this could be stored: [INSTALL_HOME]/server/webapps/enportal/custom/edge_twitter.html
- Now in the AppBoard Builder create a new Web Page widget and use the following URL: /enportal/custom/edge_twitter.html
- Click Close or Next -> Finish to save the changes.


